Thursday, August 23, 2018

Brutus Monroe Color Bursts (and a fun return address stamp!)


Hello Folks! All week we have a collaboration going on between Winnie & Walter and Brutus Monroe. Both companies were so generous with their allowance that I was able to pick up a ton of really awesome things to play with. I'm super excited to share these projects!
 
My new favorite return address stamp (there are 7 other American cities available)!! It's not personalized, so I still need to write out my address along the edge of the globe, but I love that it has the skyline of the city collected into a tiny snow globe. And I'm vowing to start using some of my old postage stamp collection. It looks so pretty here!

Then we have the Color Bursts! Yay, I finally get to play with them!! Head over to the Winnie & Walter blog for the full post, but I'm so excited that I'll share a summary here too : )


Here's a color burst panel with a Brutus Monroe stencil on top, and Winnie & Walter stamps.The intensity of this color is amazing! The best thing is that if you're not happy with how it turns out (because at this point, since I have not idea what I'm doing, the results seem very random!) you can just wet your paper and add more color to it.
In the randomness of playing around with the color bursts, I ended up with a tree at sunset. Or at least that's what I thought this looked like! The nice thing is that once you're done with the color on your panel, most of the work for your card is finished. All you really need to add is the sentiment, so you don't take away from the color. And Winnie & Walter has so many die cut sentiments to make this part even easier.
 Then I tried making a tree! OK, not bad for a first try. It's artsy : ) Quick plug for the W&W rerun feature ... there is still a week left to add any projects inspired by The Write Stuff: Picture Perfect set. Love that camera, and how you can add patterned paper to make it fun.  

This card is my favorite ... just look at the COLOR!!! It reminds me of a field of pansies with the yellow centers.
And finally, a dripping rainbow. Certainly not a new idea, but super fun to create with these Color Bursts and some water. Also, do you see the Bottle Cap sequins?! They're flat, with fluted edges to catch the light. A nice alternative to the standard sequin.

After having all this fun playing around with the colors, I'm so bummed I didn't do this two years ago after getting to see Ken Oliver himself demo'ing these. It seemed a little daunting, but now I know it's not a big deal to try. I'm already looking forward to my next coloring session! The full post with more details is at Winnie & Walter if you want to check it out.

Thanks so much for stopping by! Let me know if you end up playing with the Color Bursts!
- Kelly

Wednesday, August 15, 2018

Meet Some Cousins!

Hi Folks! I've got a few more family recipe scrapbook pages to share on the Winnie & Walter blog today! Isn't this family adorable? The mom is Brad's younger cousin, who's super smart and is a Gastroenterologist. Her husband is an assistant DA, and they have two darling twin daughters.
I watercolored a few sunflowers from In Bloom: Anna's Flora to be the main decoration on this page.
Yet another sweet family, this dad and the mom in the last scrapbook page are brother and sister. He's an Endodontic Dentist and his beautiful wife is a successful medical sales manager. Two adorable boys, and we're super excited that they're expecting another baby soon!
Just a simple glitter heart calling out for some hugs.
Winnie & Walter, LLC
Check out the Winnie & Walter blog for more information on these pages. And, I've still got many more pages to share with you!

Thanks for looking!
-Kelly

Sunday, August 12, 2018

Another Light Up Hidden Message Card!

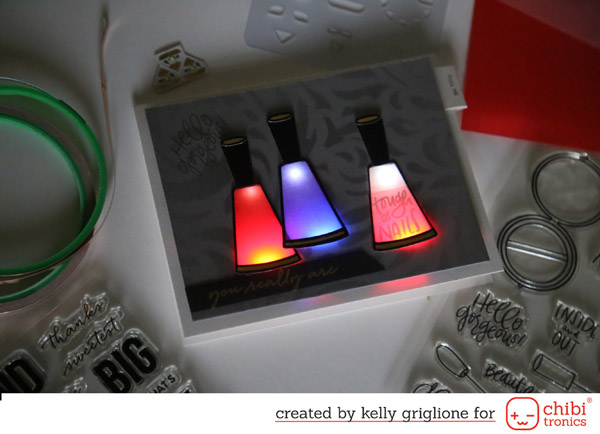
Hi Folks! I've got a fun card to share ... one with a nail polish bottle that lights up to show a hidden message!
Here's a peek into all the inner workings of the card. You can see the pieces of the vellum nail polish bottles, the cut out sections for the bottles to cover, and the circuitry with the LEDs on top of the card base.
 
The fun part was "filling" the bottles with nail polish. The first two bottles are filled with red and purple, and the last was only partially filled with pink. This provided a great place for the hidden message, which is embossed in white on the white vellum. Placing the partial pink vellum on top of the message hides it until it's illuminated from underneath. 
 Here's the card before the lights go on. And ...
 Here's the card after the lights are switched on. The sentiment reads "you really are ... tough as nails."


Here's a video showing what it looks like!

I've got the full post on the Chibitronics Blog if you want to learn more about it and see how it was made. Thanks for stopping by!

-Kelly


 Affiliate Links:


Essentials By Ellen Clear Stamps, Make It Beautiful By Brandi Kincaid

Altenew Stencils, Elegant Swirls

Chibitronics White LED Circuit Stickers, 30 pk (675346)

Chibitronics Copper Tape, 16 ft (675353)

Chibitronics Tropical LED Circuit Stickers, 30 pk (092222)

Panasonic Lithium Battery, 5 pk

My Sweet Petunia MISTI Laser Etched Stamping Tool (8-1/8 X 10-1/2)

ATG Double-Sided Refill Tape, 2 pk, 1/4"

ATG Kit, Advanced Tape Glider

VersaMark Ink Pad


Tuesday, August 7, 2018

Teacher and Medical Person ... Two New Ellen Hutson Leading Ladies!


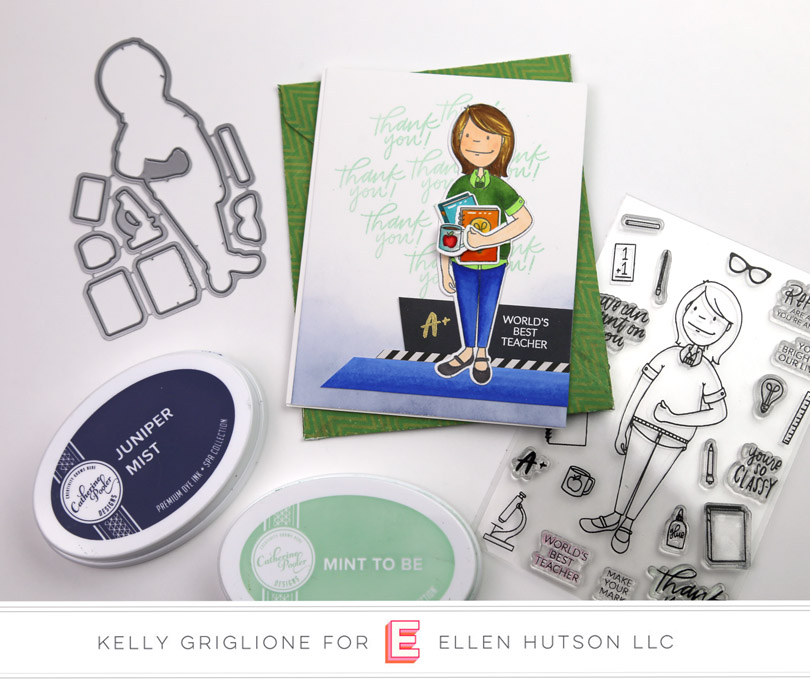
Hello Folks! I was so excited when I first saw the two new Leading Ladies by Brandi Kincaid ... Medical Person and Teacher! Aside from being completely adorable (with lots of fun accessories) I love that they perfectly fit specific types of cards: get well and teacher thank yous.


With my two boys I'm always needing teacher cards. I didn't have a stamp that shows an actual teacher, so now I can really customize the card with hair color, favorite clothing, etc. to the teacher I'm sending it to.


I often don't buy coordinating dies with the stamps because I always think I can do the cutting myself if I need to, but the teacher dies for this set are great because they actually cut the arm out so you can have your teacher carrying whatever she needs to. Super fun! I gave her a couple books, naturally, and what any elementary school teacher needs to stay sane all the way through the closing bell ... coffee! Hahaha!


The variety of sentiments in this set is great for giving your card a lot of depth and impact. I think if I would have just had the "world's best teacher" sentiment it wouldn't have been as interesting as stamping all the thank yous and adding the gold A+. I'm also happy that the thank yous double as a background for the card. Sometimes I get stuck on what to put in the background. Don't over think it ... just stamp your sentiment a bunch of times!


Then we have the Medical Person ... ack! Love her! This set of accessories will make you feel like a kid playing with paper dolls, honestly. There are so many things you can add to your card. For this one I just chose the tiny pill stamp and made a rainbow of pills for the focal point. Hey, if you need to take pills, why can't they be a rainbow?!


What really puts me over the top with her is the STETHOSCOPE in the die set! It actually goes around her neck!! How cute is that just hanging out from the card? I didn't adhere it to anything; it's snug enough to stay put without adhesive. Which is great, because I love having things that can move and are interactive on a card.

 I think this card would be a great thank you for someone who was really supportive of you during an illness, and helped get you through some difficult times.


For this card with the Medical Person I recreated an emergency room that she's coming out of! 


I folded the card base a little differently, and made it open from the middle (like the actual doors would open). Then I cut two panels out of gray cardstock for each door. After cutting a square out of one of the panels, I used that as my guide to trace a square on the other panel, and on both flaps of the card base. That way I knew the squares would all line up.

Then I added a layer of clear acetate on top of the card base, and adhered the panels on top of that.


To complete the doors, I cut an extra strip of grey cardstock for the door handle, and a strip of metallic silver cardstock for the kick plate. Oh, and to make sure people know they are emergency room doors, I cut out the red emergency room "plus sign" and added that to the center of the windows.


I added her to be slightly tucked behind one of the doors, so it looks like she's on her way out to wish you well.


I really liked opening and closing the doors, and that you can see through the windows. The clipboard she's holding has a heart beat on it (another one of the accessory stamps) but you could also use that space to write or stamp an additional message. So many possibilities!


These stamps are ones you can really have fun playing around with. And, if you don't need her to be medically themed, you can just use the top half of her. The lady in pink on the rainbow pill card would be a kid in a t-shirt if you took the stethoscope off. So versatile!


Hope you enjoyed taking a closer look at these two new Leading Lady sets from Ellen Hutson! They just went in the shop on Sunday so no waiting if you have to have them (actually, it looks like the complete release is sold out already, but you can still buy them individually)!


Thanks, as always, for stopping by!
-Kelly


Affiliate Links:

Essentials By Ellen Clear Stamps, Leading Ladies - Medical Lady By Brandi Kincaid

Essentials By Ellen Designer Dies, Leading Ladies - Medical Lady By Brandi Kincaid

Essentials By Ellen Clear Stamps, Leading Ladies - Teacher Lady By Brandi Kincaid

Essentials By Ellen Designer Dies, Leading Ladies - Teacher Lady By Brandi Kincaid

Catherine Pooler Ink Pad, Mint To Be

Catherine Pooler Ink Pad, Juniper Mist

ATG Double-Sided Refill Tape, 2 pk, 1/4"

ATG Kit, Advanced Tape Glider