Tuesday, December 22, 2020

Altenew Paint-A-Flower: Tulips Outline Stamp Set & More Release Blog Hop + Giveaway


Hi Friends!

You may have come from the blog of Terri Koszler, but if not feel free to start at the beginning with the Altenew Card Blog.

This was a fun image to paint, with a nice mix of tiny flowers in the purple daisies and pink berries, and open flowers in the fuchsia tulips. 


I originally colored the purple daisies a darker shade that didn't turn out well, so I stamped the flowers again, fussy cut the two bad flowers, recolored them, and adhered them right on top. Problem solved!

After I was done painting the flowers, I knew it needed something a little extra to finish it off. This new-ish Delicate Stripes washi tape is the perfect finishing touch. Just the right amount of stripes. And at only $2.50 it's a good one to keep in mind when you need a little something extra to make the free shipping!

Giveaway Prizes:

$200 in total prizes! To celebrate this release, Altenew is giving away a $50 gift certificate to 1 lucky winner and a $15 gift certificate to 10 winners! Please leave a comment on the Altenew Card Blog and/or each designer’s blog post by 12/28/2020 for a chance to win. 

Altenew will draw 11 random winners from the comments left on each stop of this blog hop and announce the winners on the Altenew Winners Page on 12/30/2020.

 Now I am pleased to send you to the blog of Teresa Litchfield!

Thanks so much for stopping by!
- Kelly


Products used (affiliate links, thanks so much for your support!)

Paint-a-Flower Tulips

Delicate Stripes Washi Tape


Thursday, December 17, 2020

Altenew Bursting With Creativity Stand-alone Dies Release Blog Hop + Giveaway

Hello Friends! I'm always so excited for the Altenew stand alone die releases, because you can count on them to bring us such fun new toys to play with! This release is no exception and will keep you busy in your craft space well into the post-holiday quietness.

You may have come from the blog of Nicole Watt, but if not feel free to start at the beginning with the Altenew Card Blog 

Bursting with Creativity Die Set

There a little bit of everything in the Bursting With Creativity Die Bundle ... background dies, focal dies, edgers, and even some new masking paper and double sided adhesive!

 Here's a look at five projects featuring these new dies:

1) Just Leaves Die Set  and  Layered Wood Flower Die Set

I'm a sucker for the layered floral die sets, and this Layered Wood Flower is a snap to use. Due to all the detail, only two different layers are needed for the main floral section, and two layers for the center section. The top layer is also fairly wide so it's easy to adhere.

What I was honestly most excited about is the Just Leaves die set. You can never have too many leaves!! And this set gives you about a million different combinations for the various flowers you create. I enjoyed making these in shades of mustard to rust, with a pale yellow bloom.

Did you notice the background? It's the Dots and Boxes background stamp from a recent release, embossed in gold. All those tiny bumps are just begging you to run your fingers over! And I love that it's not over powering, with as busy a focal point as this is, with all the colors, leaves, and sentiments. 

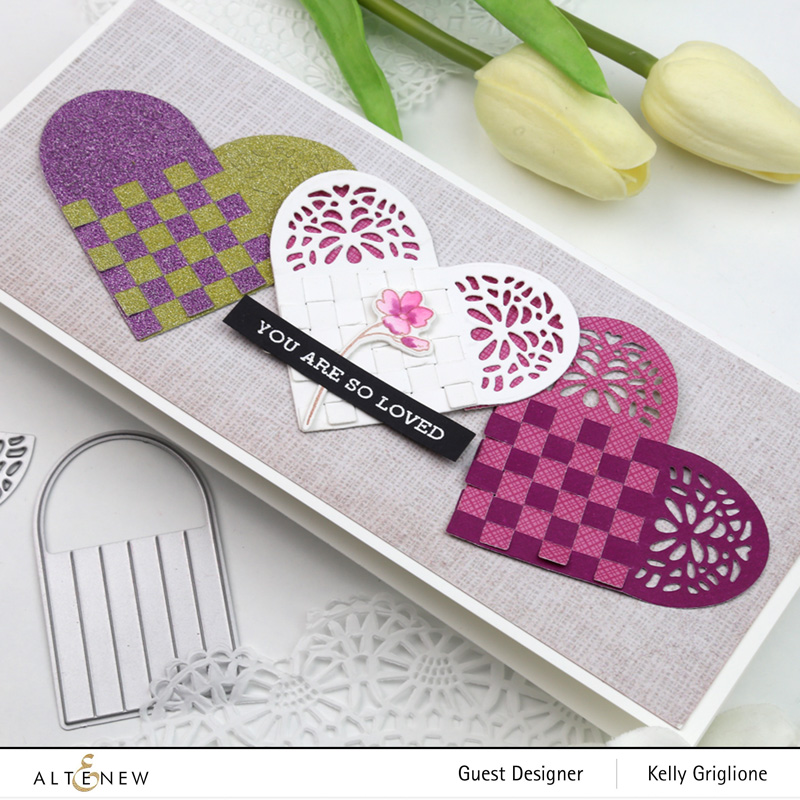
2. Woven Heart Die Set

This die was the first one I used! I couldn't wait to see how the Woven Heart Die would work, and what it would look like after you wove all the strips. Not disappointing! I had so much fun trying different papers and textures that before you knew it, I needed to make a slimline card to show them all off!


The die comes with a cute little cut-out for the top of the heart that you may chose to use, or leave solid. For the purple and gold glitter paper on the left, I used the cut-out piece to emboss a subtle pattern on the top, and for the other two hearts I cut the pieces out. You can use patterned papers to mix things up, or go the opposite and use white-on-white like the middle heart. The texture speaks for itself!

I just had to try it out with felt. Totally works! What a great embellishment this is, and would even make a cute little pin!

3. Linear Crossroads Die 

You know how the Burlap Texture Die sold out immediately this summer? Well, I predict this Linear Crossroads die will share the same fate. It's similar to the burlap die in that it's the perfect background to layer behind anything, really, to fill the card without drawing attention. But, I like that it's a little more open than the burlap die, and fades more into the background. If I had to design the perfect background splash for a card, this would be it!

The Craft-a-Flower Anemone I had laying around from a prior project, so this was pretty quick to put together. While I like crisp white panels on crisp white card bases, I do enjoy the blush color framing the card. 

4. Swirl Motif Die Set

Finally, as I was looking at the Swirl Motif Die and trying to think of what direction to go with it, I kept coming back to a fancy, antique, gilded book spine. So that's what I did! Goodness, the detail on this die set is amazing!! The fact that it's two different layers opens up a wide range of design options.

I cut the second layer of the swirl die in metallic gold, so of course the shine is ridiculous! To further flesh out the gold spine look, I used some thin gold washi, a sentiment from the Dots and Boxes set, and some gold embossed stripes from the Striped Circle background stamp


A nested label die, some tall alpha dies, and a sentiment finish off the title of my "book".


I added pages inside with some gold thread and now I have my very own Traveler's Notebook. I feel like one of the cool kids now : ) I cannot wait to start traveling again, and am dreaming of filling my book up quickly once we're able to be out and about again.

Definitely excited about some nice staples in my collection from this release (the Linear Crossroads is an absolute must-have!)

Special Offer 

Here are TWO ways to get a FREEBIE to kickstart your creativity!  

  • Get a FREE brand new Bursting With Creativity Stand-alone Dies Release Inspiration Guide (worth $5.99) with every order of high-value Bursting With Creativity release bundles. Shop HERE!

  • Get a FREE brand new Bursting With Creativity Stand-alone Dies Release Mini Inspiration Guide with every order from 12/17/2020 through 12/19/2020. Shop HERE!

  • You can find the promotion banners HERE

Giveaway Prizes:


$250 in total prizes! To celebrate this release,
Altenew is giving away a $50 gift certificate to 2 lucky winners and a $15 gift certificate to 10 winners! Please leave a comment on the Altenew Card Blog and/or each designer’s blog post on the blog hop by 12/23/2020 for a chance to win. Altenew will draw 12 random winners from the comments and announce the winners on the Altenew Winners Page on 12/25/2020.

I'm now pleased to send you to Vicky Papaioannou who has some wonderful projects to share with you!


Thanks so much for stopping by!
- Kelly


Supplies Used (affiliate links used, thanks so much for your support!):


Woven Heart Die Set

Swirl Motif Die Set

Linear Crossroads Die

Layered Wood Flower Die Set

Just Leaves Die Set

Gold Foil Washi
Dots and Boxes


Tuesday, December 15, 2020

How to Make Christmas Cards on a Budget, Without Buying Christmas Stamps!

Hello Friends! A quick post with an idea for making any last-minute Christmas cards you need, on a budget, without having to use Christmas-themed products. Shop your stash! 


Mini Delight: Pretty City Stamp and Die

Many images can be turned into the star of your Christmas cards like this Mini Delight: Pretty City Stamp AND Die set

Just chose a handful of Christmas colors, stamp, die cut, and you're done! The colors do all the Christmas-i-fying for you : ) Bonus points if you want to tuck in some holly and berries (these I just raided from my extras pile of scraps!)


Even the sentiment, "warmest wishes," is not holiday specific. But in the context of a Christmas skyline it totally has that vibe.

Thanks for stopping by for my quick post! Hope you and your families are having a wonderful holiday season so far. It might look different, but it can still be special!

Kelly

Supplies used (affiliate links, thank so much!):

Mini Delight: Pretty City Stamp and Die

Friday, December 11, 2020

12 Tags of Christmas - How to Turn an Elf into a Caroler


Hello Friends! I'm on the Ellen Hutson blog for the 11th day of the 12 Tags of Christmas where we take inspiration from Christmas carols and make tags based on those carols.

My tags are all inspired from the classic "Deck the Halls" and while I was thinking of the song, the only thing going through my head was "Fa-la-la-la-la La-la-la-la" so that's where this tag came from!

Check out the post to see how I repurposed an elf from Holiday Characters to this singing caroler with a felt-tipped pen.


You are invited to make and post your own tags based on this carol, or any of the other carols in the 12 Tags of Christmas series. Of course there are prizes involved!! Check out the full instructions and see where the inspiration takes you!

Thanks so much for stopping by!
-Kelly


 Supplies used:


Holiday Characters by Julie Ebersole, Essentials By Ellen Clear Stamps

Wonky Backdrops By Julie Ebersole, Essentials By Ellen Clear Stamps

Letterboard, Essentials By Ellen Designer Dies

Holiday Tag, Altenew Dies

Linear Pathway Alpha - Outline, Altenew Dies

Holiday Tag Sentiments, Altenew Clear Stamps

Black Jack, Catherine Pooler Ink Pad

Stamp Shammy, Lawn Fawn


Pinkfresh Studio December 2020 Stencil and Die Release Blog Hop - Four Ways to Use the Daisy Wreath!

Hi Friends! I'm excited to join the December Pinkfresh Studio Blog Hop, and can't wait to share four different ways to use the Daisy Chain Layering Stencils! I'm having so much fun playing around with these layering stencils!

You may have come from the blog of Keia Shipp-Smith, but if not feel free to start at the beginning with the Pinkfresh Studio blog


So, I had A LOT of fun with the Daisy Chain Layering Stencil and Die set!! The ease of use, versatility, and the professional-looking results are key features of this set. Have you used a layering stencil before? 

Daisy Wreath Layered Stencils

If not, they are a group of stencils where each stencil represents a different color in the final design.

I did not realize until I started using these, but there are REGISTRATION MARKS on the stencil for where the four corners of an A2-sized card should be. This is a total game-changer in the ease of use of these stencils! 
 
Not only do you not have to worry about lining each different stencil up with the prior stencil, but you also know that your final design is going to be centered perfectly on the front of your card! 


It's a little hard to see the marks because they are lined up directly on top of the card, but they are there, and making using these stencils a snap!

Let's take a look at several different ways you can use the Daisy Wreath layered stencil set:


1. Blended and Centered on the Card, as Intended
This is the first card I made, and I was shocked at how good it looked without doing anything "special" or "fancy" to it! I blended gray ink for the leaves, so the melon and coral flowers really stand out.
 
 
This could easily be a one-layer card without the sentiment, stitched panel, and crystals. 

 
2. Die Cut and Centered on the Card
This set also has a coordinating die that you can get to cut out your stenciled daisy wreath! Having the die is really useful if you want to layer your daisy wreath on top of a patterned background. 
 
Tip: Keep the white center of the Daisy Wreath so you have a nice place for the sentiment.

The background of this card is from a new set of stencils, the Diamond Plaid Stencil. It's hard to believe there are just two stencils that create this cozy plaid look. 

Two things I think plaid is fantastic for are:
 
1) Masculine cards, and
2) Winter cards.

A very useful staple to have in your craft room!

3. Die Cut, Remove Wreath, & Position Back-to-Back
Just because the
flowers are on a wreath doesn't mean they have to stay on a wreath! Here's what I mean:


Here's a photo of the die used to cut the wreath. On the right I have the two sections of flowers cut away from the wreath simply by snipping away the vine area. You would never know by looking at these floral arrangements that they were part of a wreath. 
 
Now that they are free of the wreath, you can position them however you would like. 


Being back-to-back gives you a nice space on the bottom of the card for the sentiment.
 
I used just one of the new Diagonal Plaid stencils to make the green binding of the card. Because the flowers are covering up the plaid intersection, you are left with a fun zig-zag pattern.


4. Die Cut, Remove Wreath, and Position in a Swag
There are many different layout options with these two floral pieces, but another one that seemed to work well is to arrange them into a swag pattern. The swag is a really nice element to move your eyes down along the card.

I got a "sympathy vibe" from this swag arrangement of flowers, so I used quiet colors for the flowers and leaves. The tan and blue plaid I made for the lower left corner is a quite, cozy pattern. I added a thin blue line with a colored pencil to make the plaid pop a little more.
I know there are many more ways to use the flower sections (one in opposite corners, or cut two wreaths and have flowers in all four corners) so it will be fun to keep playing around with this set!
 
I do have one more card to share, and this one uses another Layering Stencil set!
It's a slimline card featuring the Seamless Floral Panel Layering Stencil Set. Instant patterned paper, in whatever color combination you're looking for! 
 
Did you happen to notice the "Seamless" in the title of the product? I was so happy to see that! This is such a SMART design that repeats as often as you need it, just move the stencil up to where you left off. 
The stencil is sized for an A2-sized card, but since the design repeats, you can easily use this to cover a slimline card! It's like a 2-for-1 deal! Here you see how I've taped an A2-sized card to my workspace so I can consistently position the registration marks, and then put the slimline card on top of that. Once I'm done using the stencil, I move it to complete the top of the card.

 
The sentiment dies are from the older
Essentials: Classic Word Die Set and I love how they stretch across the entire length of the slimline card.

What a fun release this is! I'm really into the Layering Stencils now, because it's an easy thing to do when you're hanging out watching TV (lots of that going on this year!) and you get consistent, quality results.

GIVEAWAYS: 

Pinkfresh Studio will be giving away the full release on the Pinkfresh blog, IG feed & YouTube channel! A $25 gift card will also be given away to a commenter on every stop in this blog hop, so don't forget to leave a comment! Winners will be picked from the comments and posted on December 18, 2020 on the GIVEAWAY PAGE. You must check that page & claim your prize within 2 weeks.


SHOPPING PROMO:

Free US shipping on all orders $50+ now thru December 17th! No code needed.


30% off discount on all full size ink pads - now thru December 17th! It's a great time to fill in any of your holes. Promo code is INKPADS30.

You are invited to the Inlinkz link party!

Click here to enter

I am now happy to send you off to the amazing Kelly Lunceford who is going to wow you with her projects!

Thanks so much for stopping by!
-Kelly


Supplies Used (affiliate links, thanks so much for your support!)

Daisy Wreath Die

Daisy Wreath Layered Stencils

Diamond Plaid Stencil Set

Seamless Floral Panel Stencil Set