Thursday, September 30, 2021

Four Different Ways to Stretch (Literally) a Portrait Layering Stencil!

Hello Friends! I've got four different ideas to share on using a set of layering stencils intended for use on a portrait card!

Wintry Forest Layering Stencils

This is the set I'm using for these cards today, the Pinkfresh Studio Wintry Forest Layering Stencils. The nice thing (on the pocketbook) is that there are no coordinating stamps, dies, hot foil plates, nothing. Just the stencils!


This is how the stencils are intended. There are five different tree layers to blend your ink through. This results in a forest with a ton of depth on your card. At this point, all you really need is a sentiment, and you're good to go.

This set also comes with a SIXTH layer, of snow! I got out the embossing paste and finished my wintry scene.


Just because your stencils are only wide enough for a portrait card, doesn't mean you can't use them on a landscape card. Just move them over! A literal STREEETCHING of your supplies!

I blended ink through most of the stencil, and then before I got to the end, I picked it up and placed it right next to where I left off, taking care to start where one of the trees started. Otherwise, half of a tree might look unusual ; )


This time I only used three of the layers, and left the snow off so I'd have a more solid background for my white sentiment.

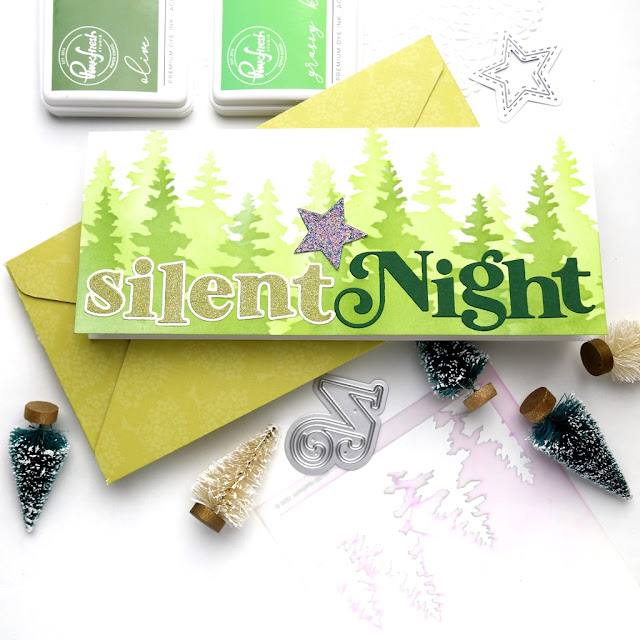
While we're talking landscape cards, how about go big and try a landscape slimline card?! For this long card I've only used two of the tree layers. 


I put a star right over the seam where I joined the two portrait stencils (although if I had been a little more careful I could have definitely avoided that seam).

Love that the alphas for Silent Night filled the whole card! Using a fancy upper case N really helped stretch it all out.
 

Finally, for the last card I made a portrait slimline card. On this one, I moved each of the tree layers higher than they were intended to be. This is a great way to stretch the design to fill a card this tall.
 
Hopefully you have some ideas on how to stretch your stencil supplies. Let me know if you figure out one to stretch!

Thanks for stopping by!
-Kelly


Supplies used:
 

Wednesday, September 29, 2021

Two Ideas for the New Pinkfresh Inna Alphas


Hello! Not sure how to use the fancy large alphabet dies from the latest Pinkfresh Studio? I've got two ideas and cards to share using the gorgeous and unique new Inna Alphabet stamps/dies/stencils!

Inna Alphabet Stamp Set

Inna Alphabet Die Set

Inna Alphabet Layering Stencil Set

Here is what the products look like. What I LOVE is that they are all connected!! You can see there are two stamps for the alphas (beginning and end of the alphabet), two dies for the alphas, and only one set of stencils. This means your time and effort is truly maximized. Could you imagine the work (and storage!) required if you had to line them all up individually? No thank you.

Once you stamp, stencil and die cut your pretty alphas, now what?

Idea #1: Go Vertical


I like to pick one word out of a sentiment and spell that with the letters. Then the rest of the stamped sentiment goes before and/or after the word you made.


These wide letters are the perfect size to fill up a mini slimline card!

Stripes are from the Slimline Skinny Plaid Layering Stencil, and sentiment is from the new Blooming Branch Stamp Set.


Idea #2: Go Storybook


This idea works for any die cut sentiment you have. Just cut the first letter off, and replace it with one of these fancy floral alphas. Boom! Instant storybook.


What a great way to add some beauty to your sentiments! This sentiment is over the new Lush Peonies Stamp Set, but it would be equally beautiful on its own.

With all the layering stencils, this really was an easy card to make!

Hope you got some ideas for the new Inna Alphabet Stamp Set! I can't wait to incorporate these beautiful letters into more projects!

Have a great week!
-Kelly


Inna Alphabet Stamp Set

Inna Alphabet Die Set

Inna Alphabet Layering Stencil Set


Monday, September 27, 2021

Pinkfresh Studio September Stamp, Die, Stencil, and Hot Foil Release


Hello Friends! It's time for the Pinkfresh Studio September Collection to be released! It's a great collection with many floral stamp/die/stencil sets, a storybook alpha stamp/die/stencil/hot foil, and a wonderous invention called ...
 
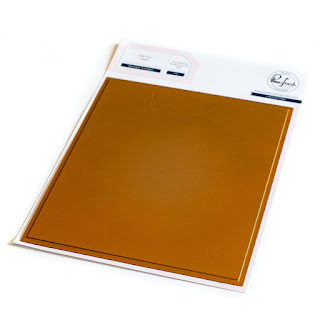
... a Solid Hot Foil Plate!! You guys, this magic tool brings back to life all the negative foils that you'd throw in the garbage after foiling! It literally presses whatever foil is left onto your paper! You now get THE NEGATIVE IMAGE FOILED! 
 
Unfortunately many of the design team didn't get the Solid Hot Foil Plate delivered yet, but you betcha I've already gone thru my garbage and pulled out all my negatives in preparation : ) 
 
OK, so now let's take a look at some of the other goodies in this release:

The Blooming Branch Stamp Set is a nicely wispy floral arrangement, that is perfectly laid out to fill a standard A2 sized card base in such a beautifully balanced way. Even with room for a stamped sentiment next to it!


I love how this arrangement gracefully curves down and around the card. This card was made to show how you don't have to do anything fancy with dies, multiple images, other images, etc to get a beautiful card. Just stamp the image on your card, and start coloring away.
 
The white space above the arrangement is the perfect size for "Huge Thanks," one of the main sentiments included with this set. The secondary sentiment "you are the best" is also included with this set. I often like to add these secondary sentiments on a sentiment strip adhered over the image(s).


I used just a portion of the previously released Stitched Scallop Rectangles Die Set to make a spine on the left edge of my card. I think this card would have been fine without anything on the edge, since, like I mentioned, the flower arrangement is so well-balanced, but I went ahead and added it anyway. The stripes are made from the Slimline Skinny Plaid Layering Stencil.


For the flowers I went with blues and greens, and then a hot pink center. The leaves have a base of pink color, and then for the second layer of "color" I applied Versamark thru the stencil, and embossed it in gold. Love the overall shine it gives in so many places throughout the card!

This next card shows another idea on how to use the
Blooming Branch Stamp Set.


Instead of using this floral stamp as the main image, it also works very nicely as a "filler" stamp set. This card features the
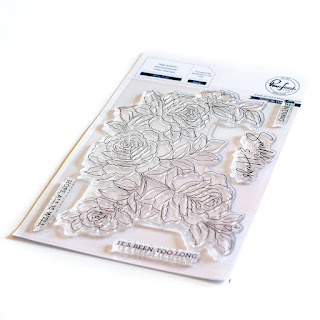
Garden Roses Stamp Set in yellow, and to get a fuller look, I cut apart the Blooming Branch and added parts of the tiny purple flowers behind the roses.


The middle showcases the new Inna Alpha stamp/stencil/die/hot foil set! These letters are so beautiful, they are the perfect feature character. What a nice way to personalize any type of card you are giving, with the initial of the recipient. "G" for Griglione in this case : )


The Essentials: Braided Circles Die Set is one of those "essentials" that always seems to come in handy. I've used two of the circle dies here for a background for the Inna alpha. 

A white gel pen around the margins of the navy base of the card finishes it off and doesn't let those florals get too wild and crazy.


GIVEAWAYS:

-We will be giving away the full release on the Pinkfresh blog & YouTube channel! How awesome is that?!

-We will be giving away a total of TEN $25  gift cards along the hop. Winners will be picked from the comments and posted on October 5, 2021 on our GIVEAWAY PAGE. Winners must claim your prize within 2 weeks.


SHOPPING PROMO:

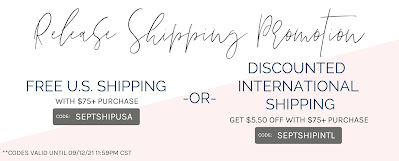
We are offering free US shipping on all orders $75+ from September 27th to October 3rd. See the above graphic for the apporpriate code.

You are invited to the Inlinkz link party!

Click here to enter

Monday, September 6, 2021

Pinkfresh Studio Holiday Stamp, Die, Stencil, and Hot Foil Release


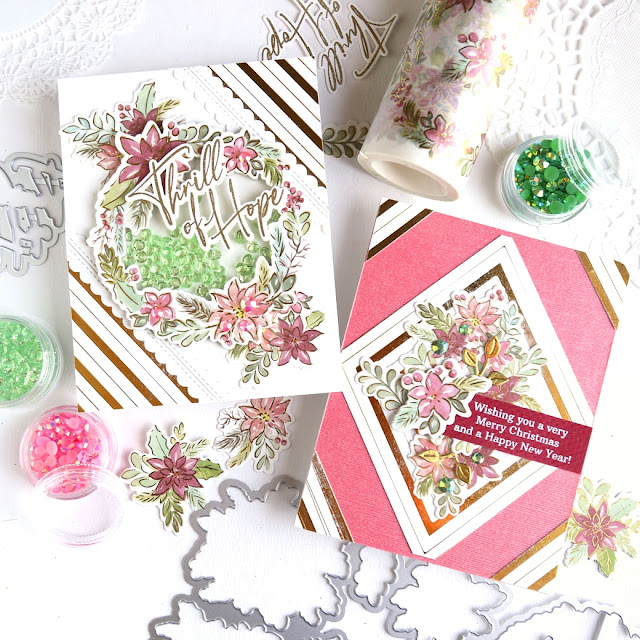
Hello Friends! I have a two-for-one to share today ... one set of washi die cuts and one Diamond Hot Foil turns into two different cards using the new Holiday Release from Pinkfresh Studio!

These are the two products:


Poinsettia Washi


Diamond Hot Foil


where one pass of the dies, and one foiling of the plates, gives you all the supplies you need to make these two cards:


Not bad, especially when making holiday cards, where you often need to make many of them. Let's take a closer look at each card!


Don't ever feel like you have to use the entire portion of a design. With the Diamnd Hot Foil design, I just cut the corners off and adhered them to opposite corners of the card base. Who would have guessed this was originally a diamond hot foil design?


For the focal point, I went for a shaker element inside the wreath. Love the lime colored gems! Also, I added several layers of thick cardstock under the sentiment, from the
Thrill of Hope Stamp Set.

What I love about having all the washi flower pieces is that you have flexibility to make the focal point fit your space. Originally, of course, the poinsettia wreath is circular, but with the additional flower pieces, it's easy to stretch out the wreath to fill the diagonal space. I just added a cluster to the upper left and bottom right areas under the wreath.


After cutting the other two corners off the Diamond Hot Foil, this second card uses the remaining middle diamond. Perfect way to frame an arrangement of poinsettia's!


Look at all that lovely gold!! I added in a few tiny gold leaves by the sentiment for good measure.

Again, since there are so many washi die cuts, I'm able to add them together to fit the space we have. This time, a diamond.


It's really pretty crazy that these two cards have so much in connon. I love being effecient with my time and supplies!


GIVEAWAYS:

-We will be giving away the full release on the Pinkfresh blog & YouTube channel!

-We will be giving away a total of TEN $25  gift cards along the hop. Winners will be posted

on September 14  , 2021 on our GIVEAWAY PAGE. Prizes must be claimed within 2 weeks.


SHOPPING PROMO:

We are offering free US shipping on all orders $75+ from September 6th to September 12th
See the graphic in the blog hop graphics folder above for code.

Here's the group of talented crafters in the blog hop:

You are invited to the Inlinkz link party!

Click here to enter

Thanks so much for stopping by!
- Kelly


Supplies Used (affiliate links, thanks for your support!!):

Poinsettia Washi Die

Poinsettia Washi

Thrill of Hope Stamp Set

Thrill of Hope Die Set

Diamond Hot Foil