June is a magical month in Altenew-land ... the
Stamp/Die/Stencil release from a couple weeks ago was ridiculously good, and now there's a stand-alone die release that's right up there with it ... can it get any better?! Let's take a look at some pretty darn cool dies in action!
COLOR WHEEL DIE
For this card I went with a traditional look by using it as an actual color wheel. All the pieces are adhered onto a black card base to make them really pop.
For the colors I loaded up my paintbrush with as much watercolor as I could get from the
Altenew Watercolor 36 Pan Set and colored the outer segment of the "pie." Then without loading more paint I covered each of the next sections until the watercolor ran out and I got to the center of the color wheel. For some colors I repeated this process twice. But I love the illusion of having lots of different colors, when it's really just a less intense version of the same color each time.
The sentiments are from my gloriously large collection of pre-made sentiments sitting front and center on my desk, from last week's
Sentiment Strips set (SO NICE just picking a few out and putting them on the card!)
I'd ask you to keep the stars in mind, as they're leftover from a card I made later in this post. Love using everything right away, and keeping things out of the garbage.
Speaking of using everything ... I still had the outline of the color wheel available, so I put that right to use on this quick but graphic card:
The heart is hand cut and layered behind the grid. I love how the center of the grid points to where "you're in my heart." Just like a bullseye!
Also love all that texture you get from the very finely die cut lines.
Given the clean and graphic nature of this card, I think it's perfect for a masculine card.
Two cards with just one cut of the die!
DAINTY BLOOMS DIE
This
Dainty Blooms Cover Die is pretty darn incredible. There's so much interest here, I turned one die cut into THREE different cards!
I knew I wanted to use all the pieces of the die to create a mosaic-type garden. I also wanted to leave some white space on my card so I elected to split the cover plate into two sections, the top third and the bottom two thirds, where each section has its own color scheme. After coloring, I used
Jennifer McGuire's Glad Press 'N Seal trick to keep all the pieces in place.

Here's what I did with the top third ... adhered the pieces to the blended section of a card base.


I was happy to still have the bottom two thirds available for a second card, so this time I pulled out a gray card base so the pieces will really stand out.

With all this detail, all you really need to finish the card is a sentiment layered on top.
So what's left for the third card?
You may have guessed, the outline of the cover plate die. I finished coloring the lines from when I was coloring the interior pieces.

Then I laid the cover plate over my card base and made pencil marks where the inside of each flower and leaf was. This gave me the help I needed to blend color in the right spot.
Finally I added some coarse, clear glitter, and then triple embossed the sentiment from the
BAF Crocus set. Not gonna lie, there's a lot of shine and sparkle on this one!
And here they all are together ... all from one pass of the die!
Of course I had to cut it out in gold! So luxurious. The best thing about this card is that I only used a small portion of the die. I cut one wedge from the circle and wrapped it around the cone that's holding the flowers.
The detail in this die is really something else, and it really looks like a fabulous piece of jewelry on this card. I blended green ink on the bottom of the card so the white and gold cone would stand out more.
The flowers are from another recent release, the
BAF Crocus set. Love that the layers are so quick to line up, stamp and die cut out!
I was so curious to see what this set of dies would look like once they were layered together! Would you like to see?
This is a high school graduation card for a very special young woman who is going to do great things one day. Her list of accomplishments are many, and the fact that she excels while having a debilitating disability is even more impressive (Ehlers-Danlos Syndrome, POTS, and many other associated conditions). So it was no surprise when she got admitted to Columbia University in NYC!
Even though there are only three dies, I was able to get four different colors on the stars, including the school color Columbia Blue.
Thought I'd share the inside of the card, and also show how the stars on the front are see-thru. I had a pile of the negative stars on my desk, so I used some for the inside of the card, some for the envelope underneath, and the remaining white stars ended up on the first card of this post (remember, the color wheel card on the black base?) Having the stars throughout your design gives it a more custom feel.
This die set looked very intriguing to me when I first got it ... what would it look like, and will I ever be able to figure it out?!
Turns out it looks AMAZING, and it wasn't hard at all to assemble!

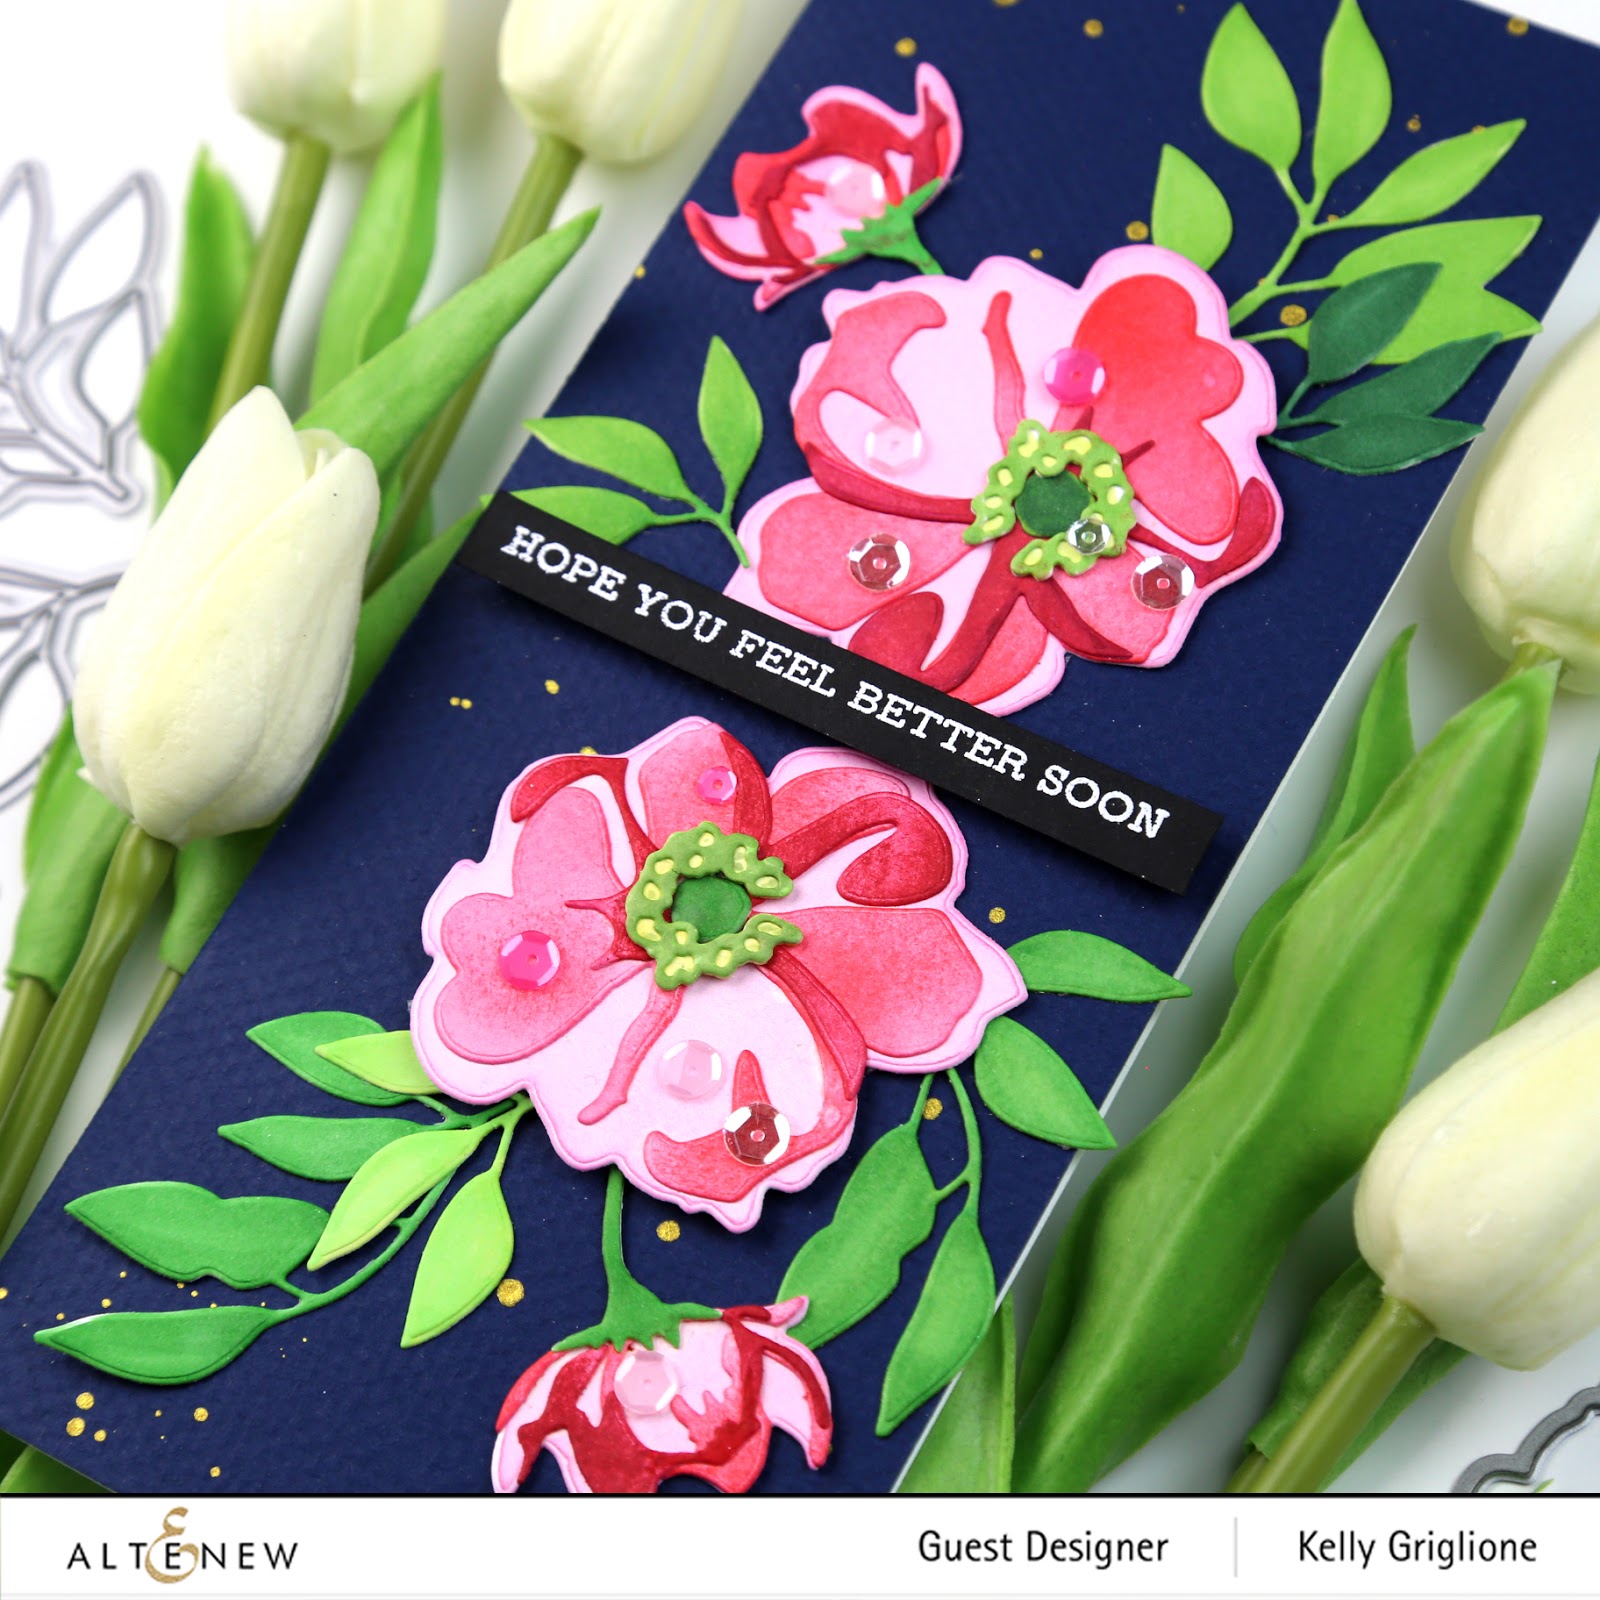
Instead of solid colored cardstock, I used ink blended white cardstock so there would be slight variation in the colors. Since the shapes were finely detailed, however, I didn't want too much variation in color.
They're just gorgeous! I love that there is a large flower and a smaller bud included with the set.

And a few different leaves (which would be good to add for any of the Altenew florals). Using a deep navy card base with gold spatters really highlights the florals and leaves, and even brings the black sentiment out slightly. I'm really enjoying making these tall cards. Two sets of these florals really fills out the tall card nicely.

Thanks so much for sticking with me through the parade of cards! It's been such an inspirational few weeks of releases for Altenew. I can't wait to see how they can top this!
Here's the full June die release, bundled for extra savings.
Prizes:
To celebrate this release, Altenew is giving away a $50 gift certificate to 6 lucky winners! Please leave a comment on the Altenew Card Blog and/or Altenew Scrapbook Blog by 6/24/2019 for a chance to win.
We’ll also draw a winner to receive a $15 gift certificate from the comments left on each designer’s blog on the blog hop list below. All winners will be announced on the Altenew blogs on 6/27/2019.
I'm the final stop on this blog hop, which means you made it! You may have come from the wonderful Michelle Murray, but if not feel free to start at the beginning with the Altenew Card Blog. Sure hope you got some incredible inspiration from all the amazing artists on this hop! Now you just need to figure out what's on your shopping list, and what will make its way into your cart : )
Thanks so much for stopping by!
-Kelly
If you like the cards in this post, feel free to follow my
Instagram account so you don't miss out. I'd love to see you there!
Products Used (with affiliate links, which I appreciate, at no cost to you):
 |
| Vintage Roses 3D Dies |
 |
| Layered Stars Dies |
 |
| Delicate Mandala Die |
 |
| Dainty Blooms Cover Die |
 |
| Color Wheel Die |
Blog Hop Order:
Kelly Griglione <---You are here!