Sunday, March 4, 2012
Elephant Baby Card [CFC42 and PDCC121]
The Play Date Cafe color challenge and the CAS-ual Fridays baby card challenge work perfectly together, and inspired me to make this elephant baby card.
I was so thrilled to find this great white fabric at a flea market last month ... for ONE dollar! There are yards of it, and it has the best texture, just like a cozy baby blanket. The ribbon is also vintage, and so super thick and silky. Any chance I get I buy antique or vintage - such great quality materials!
The dangling metal initial will be changed once I know the name of my cousin's baby. For now, it's an "E" for Elephant : )
I changed my mind on the outside of the card, so being resourceful and using what's left on my desk, I put the angel wings heart on the inside for the sentiment.
Thanks for looking!
Supplies used:
A Muse Valentine's Elephant Stamp
American Crafts Texture Stamp
PTI Double Ended Banner Die
Letter Stamps
Watercolor Pencils
American Crafts Pink Glitter Polkadot Cardstock
Alphabet Beads
Vintage Fabric
Vintage Ribbon
Buttons
Saturday, March 3, 2012
Acorn Baby Card [CFC42]
I wanted to make a non-traditional baby card for this week's CAS-ual Friday challenge. I've always liked the simple saying, "Mighty oaks from tiny acorns grow," so thought that would make a fun theme for the card. Unfortunately I don't have a size-appropriate acorn stamp.
So I had to draw my own acorn. A texture stamp helped for the cap, and because I don't have any Copic markers I used watercolor pencils for the nut. Originally I had the acorn in the dirt under the grass, but thought it looked better in between the grass blades.
I made a dandelion (from the PTI Bloom Builders die) since I wanted to have muted colors to keep the focus on the tiny acorn.
The "dirt" texture is made from the crimper, running it through a couple different directions and not squeezing very hard on the last pass so the prior crimps aren't flattened.
Since I can't leave things alone, I played around with adding a sun behind the cloud, but thought it was a little too simple for the space it took up (maybe fibers or glitter would help).
Not having anything at all except the acorn on top of the hill was nice, but I thought maybe a little too plain.
Having a messy desk is why I usually have multiple ideas for a card. Elements from prior projects are lying around and suddenly they're perfect for my current project. Funny how that works out sometimes.
Thanks for looking!
Supplies:
American Crafts cloud paper
American Crafts texture stamp
PTI Bloom Builders die
PTI simply chartreuse cardstock
PTI double ended banner die
heart brad
white gel pen
water color pencils
crimper
Friday, March 2, 2012
A Month in Photos [February 2012]
One sixth of the way to having a year's worth of monthly layouts! Here's what our February looked like (January 2012 here)
- tabernacle in Holy Name Cathedral downtown Chicago (at the Election Ceremony)
- happy to rediscover my crafting groove and make a dozen cards
- being goofy at the library's 40th anniversary party
- chubby hands make the most beautiful valentines!
- birthday night out for melt-in-your-mouth steak dinner and American Idiot theater
- relishing the smells throughout the house on crock pot dinner nights
- Great Grandma Dryer and 67 others celebrate her 90th birthday. No need to worry Grandma, there was plenty of food!
Feel free to play along if you'd like a year's worth of memories, one easy month at a time. I'm so happy with how little time it takes from start-to-finish! Rebecca has posted a free template for you and is hosting a link party for everyone to share their progress.

Wednesday, February 29, 2012
Retro Richard Scarry Card [CQC126, SRC #113]
This color challenge inspired my inner 70s child to make another card. How fun!
There's also a fun challenge at Stampin' Royalty to use only paper and ink, no embellishments. Yikes!
This time I targeted an old Richard Scarry book placed in the donation pile because my kids never really got into it (seriously, why not? it's classic!) After I thought about it, all I could see was 100 pages of great illustrations going out the door. So it stayed here. It was a little ... pun alert ... "scary" cutting the pages
but obviously I got over that and cut out a cute image of a crying pig from the "This Little Piggy Went To Market" nursery rhyme.
I thought the story line went along with an "I miss you" sentiment, so I put that under the pig illustration.
Brads for the "i" dots.
Thanks for looking!
Supplies used:
- PTI Block Letter Dies
- Dictionary Page
- Richard Scarry Book
Retro Boy's Car [CQC126]
Love the challenge at Colour Q - how retro! Totally takes me back to the 70s.
I'm excited to finally use some of my vintage ribbon that got rescued from the garbage. Mom was cleaning and luckily I saved a couple gems.
Can you get more 70s than these stripes?!? Used brads for the hubcaps, and left-over acetate from my Pop-up Flower card for the windshield. It's not a lot, but I like adding small details like that.
Thanks for looking!
Supplies:
Stampin' Up Wonderful Words Stamp
Martha Stewart Car Stamp
Color Box Tangerine Ink
Brads
Acetate
Mom's Vintage Ribbon
Liebster Blog Award
I have had such a fun time these last two months finally getting out there and participating in the blogging community. So many creative individuals, it's really overwhelming. Imagine my surprise when I received a Liebster Blog Award from three lovely ladies with incredible blogs:
Cyndie who is not afraid to try new things or techniques to provide others with inspiration. You need to check out her flowers made of modeling film!
Suzanne whose blog is the first one I fell head over heals for. Each and every card is so well executed. It's always a treat to see her posts.
Nancy who is a crafting chameleon - making graphic clean and simple cards, then switching it up to do more vintage, layered cards.
Now for details on the award. 'Liebster' is German for 'dearest'. The award is a 'share-the-love' arrangement, given to inspirational bloggers with less than 200 followers. Here's the to-do list of any Liebster award recipient:
- Thank the giver and link back to the blogger who gave it to you;
- Reveal your five blogger picks and leave a comment on their blog to let them know;
- Copy and paste the award on your blog; and
- Hope that those you award forward it to their favorite bloggers.
Below are five favorite bloggers who have different styles but always inspire me with their work. This award is a great chance to officially thank them for sharing their passions with the rest of us.
Nicole at oncloud8 (fantastic photography and life experiences - spaghetti on a table)
Kirsti at Bondi Papercraft (perhaps my favorite card ever - a cassette tape with ribbon coming out that spells "I Love U")
Mindi at Niebuhrchicks (great project life pages and free printables - thanks!!)
Chris at Hutch Studio (inspirational 3D paper projects, like a paper house light fixture)
Marie at Stitch in Time (love her mixed media scrapbook pages and December Dailies)
Thanks so much for all the inspiration you've given me! Please share the love and visit these talented individuals.
Monday, February 27, 2012
Multi Challenge Card [MIM #55, CFC41, PDCC 120]
A triple card challenge today:
1) Papertrey Ink's MIM #55 - make a large frame using a smaller frame stamp
2) CAS-ual Friday's CFC41 - use a pun on your Clean and Simple card
3) The Play Date Cafe's PDCC 120 - use only baby blue, orangesicle, and basil colors
So being the queen of efficiency (laziness?!?) I thought why not combine all three challenges. And so I did. Whew.
This is the color scheme inspiration.
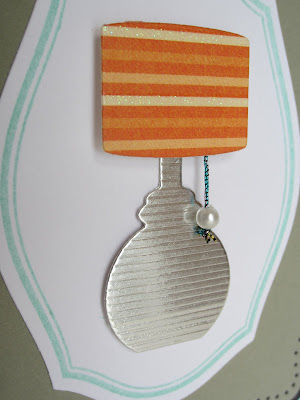
And here is the card. I LOVE (and have) mercury glass lamps so that's what I wanted the lamp base to look like. American Crafts silver foil paper is the closest I could get, and I'm pleased with how it gives a nice shine, similar to a real lamp.
I thought it would be fun to add a pull chain for the switch, so I suspended a pearl from a blue (remember the color challenge!) metallic thread. You can see the reflection of the pull chain in the base. The pull chain is on one layer of mounting tape, while the lamp shade is on two layers to give it depth.
The larger black frame is used by stamping half of Papertrey's Fillable Frames #4 four times, lining up each end. I used a straight piece of paper to make sure only the ink from the top half would stamp. So glad this technique was spotlighted, would have never thought of it on my own.
And of course the pun is you "light up" my life. Could be used for birthday, thank you, thinking of you, congrats, whatever. Lots of flexibility with this one!
So in between dropping my son off at religious ed and going to Aldi's, I thought maybe it would look neat to rub a white ink pad over the textured background so it wasn't so blue. Does anyone else think about crafty things at odd times?!? So before putting the groceries away when I got home, I came up to my craft room and tried it out. I'm thinking I should have focused more on remembering the chili powder than messing with the card. I prefer the solid blue background instead. Oh well, win some, lose some.
Thanks so much for looking!
Supplies:
PTI Lighten Up Stamp and Die
PTI Mat Stack 4 Stamp and Die
PTI Fillable Frames 4 Stamp
PTI Damask Impression Plate
PTI Aqua Mist and Black Ink
American Craft Silver Foil Paper
Metallic Thread
Pearl Bead
Subscribe to:
Posts (Atom)


