Showing posts with label Functional Friday. Show all posts

Saturday, April 4, 2015

Summary Saturday: Heart Border Die

Welcome to a slightly different Functional Friday where I'm happy to review all of the different ways the Top Dog Dies' Heart Border Die has been used over the past three months. Yes, I am officially closing the book on this die : ) Like the Functional Friday articles, my hope is that even if you don't own that exact die, the ideas will translate to similar dies you do own.

Each of the photos and captions below are linked to the original article in case you missed a project and want more details on it. 


stitch shapes
wrap small packages
create a stained glass look
dress up vases or wine bottles
layer to make different patterns
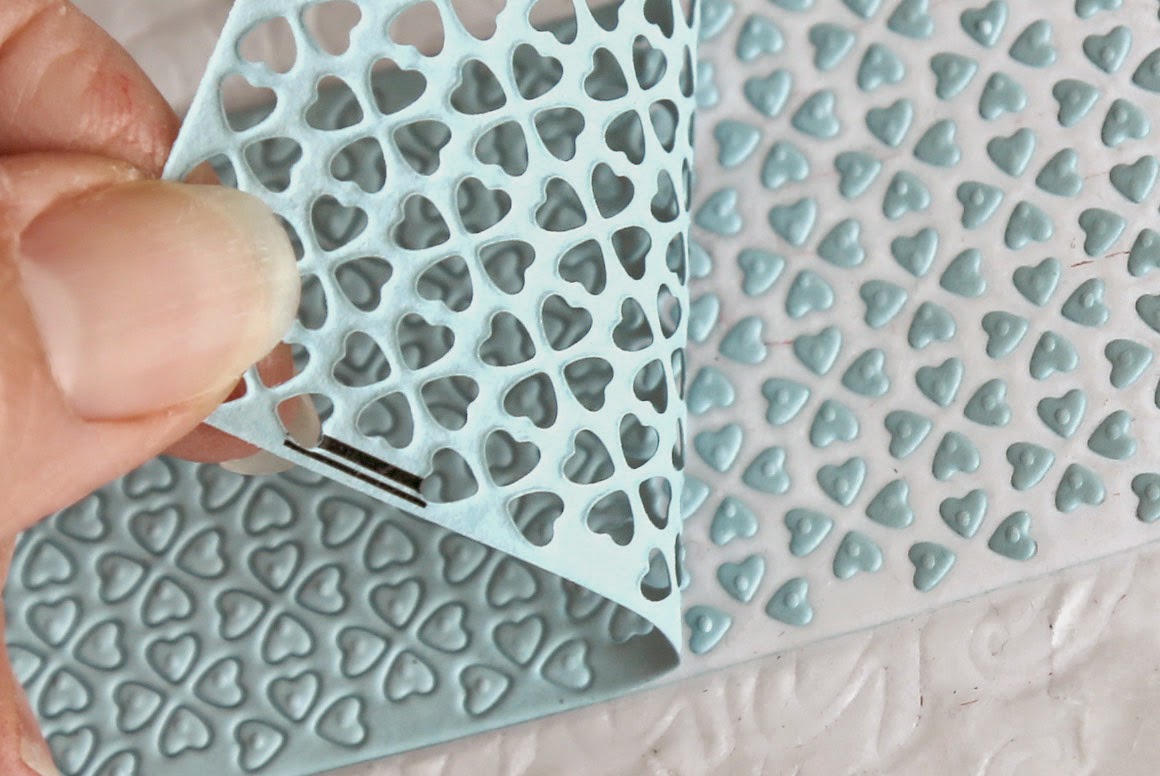
use the old dryer sheets for a detailed background
BEST TIP EVER on getting those tiny die cuts out ... what a life saver!!!

Thanks so much for all your feedback throughout this series! It's been so wonderful to read your thoughtful comments. We are currently in the middle of packing up our home of the last 17 years and getting it ready to be put on the market. Packing has come to a large halt after finding severe water damage in our master bath that has caused us to tear it down to the studs. This surprise remodel has taken on a life of its own as we navigate through the permit process, find replacements for everything that is not standard in our house, attempt to save money by doing everything we're able to by ourselves, and uncover additional hidden issues. Unfortunately, this all means I haven't had much time left at the end of the day to be out and about in blogland. I'm really looking forward to some time coming up where I'll be able to say "hi"!! Until then, have a wonderful weekend, and a blessed Easter if you celebrate!

Hugs,
Kelly


Saturday, March 28, 2015

Functional Friday: Cover Plate Stencil

Hi all! Time for another Functional Friday installment. In case you missed this post, I'm featuring one die from Top Dog Dies each month, and each Friday I'm sharing a different way to use the die. My hope is that even if you don't own that exact die, the ideas will translate to similar dies you do own.

 
If you're reading this real-time, you may be wondering why it's indeed Saturday when I'm posting a Functional Friday article. You see, I had Summary Saturday all lined up, where I was going to recap of all the Heart Border Die projects, but there was one more idea I wanted to try. Let's take a look ...


Rather than use the actual negative or positive die on the card, I used the die as a tool for a stencil/blending project. The die is only an inch or two wide, but since there's a repeating pattern it's easy to sponge ink through it one time, move the stencil down your card, line it up with the previously inked area, and stencil some more. After repeating this several times you end up covering the entire card. 


After sponging in the hearts, I removed the stencil and blended the background with the same color to give it a richer look.


For the sentiment, I colored each letter of "color" with a different copic marker on top of the white embossing. 

OK, so aside from next week's recap, this is really it for the Heart Border Die. I pinkie promise!

Thanks so much for looking!
-Kelly

Friday, March 13, 2015

Functional Friday: Dryer Sheet Leftovers

Hi all! Time for another Functional Friday installment. In case you missed this post, I'm featuring one die from Top Dog Dies each month, and each Friday I'm sharing a different way to use the die. My hope is that even if you don't own that exact die, the ideas will translate to similar dies you do own.


This technique uses the actual dryer sheet that I've been using to get all the pieces out of the heart border die in one step.  Let's take a look ...


Right after making last week's teen boy card with the Heart Border Die squares, I noticed that the dryer sheet I was using had a neat, unintentional, layered look to it. I was really excited to use this on a card as a background!


Love the overlapping, love that you can see some old layers of white hearts underneath, love the waxy texture that's developed from running it through the die cutting machine so many times, love that it's totally random and unplanned. And I love that I didn't need to spend any time creating it!


Here's a closer look at the Sheep Die. I cut a layer of silver for the head and legs, then a layer of white for the body, then a layer of batting to make it fluffy and more realistic.


You may be thinking this is quite an odd subject matter for a birthday card. A sheep with a "15. whatever" sentiment. Well, I really enjoy the dry sense of humor my Godson has, and I think he'd really love to see a sheep sassing him like this on his birthday. Whatever. You're 15. So? Hahaha! We'll try something than the usual "happy birthday" with him this year.

I think we may be done with the heart border die! The monthly spotlight somehow turned into 2 1/2 months. Next Friday I'll either pick a new die, or do a recap post.

Thanks for looking!
-Kelly

Friday, March 6, 2015

Functional Friday: Layered Looks

 Hi all! Time for another Functional Friday installment. In case you missed this post, I'm featuring one die from Top Dog Dies each month, and each Friday I'm sharing a different way to use the die. My hope is that even if you don't own that exact die, the ideas will translate to similar dies you do own.


This technique layers the holey part of the die cut to make different secondary patterns. This is great for when you need to make a teen boy card, like this one, but really want to use your heart border die. You don't necessarily want him looking at all those lovey-dovey hearts! Let's take a look ...


First I cut the Heart Border Die in four different colors.


I layered two colors at a time and cut them into squares. Some of the edges overlap to give it more of a random, rough look. The squares are all just attached in the middle of the card underneath the word balloon. The curled edges add to the teen-boy-look as well. The word balloon and cheeky sentiment are from My Favorite Things.

 
Here's a closer look at the different patterns you can get just by changing where the dies overlap. Starting from the top left and going clockwise, we have:

- full coverage, where the bottom orange layers fills most of the holes;
- eyeball effect, where looking at the two holes together, you see gold where the whites of your eye would be, black irises and blue pupils;
- diagonal stripes, with black and blue diagonal lines; and
- sweater pattern, with tiny black horizontal dots in between two rows of blue and one row of black.

Even if you think my pattern descriptions are goofy, the point is that you can really get a lot of different looks just by playing around with how the layers are positioned. You can create a nice patchwork effect this way, and get more mileage out of your left over die pieces.

Thanks again for stopping by! I've got one more heart border card for next week, using the actual dryer sheets that have gotten so much use around here this month.

-Kelly

Friday, February 27, 2015

Functional Friday: Simple Stained Glass Effect

   Hi all! Time for another Functional Friday installment. In case you missed this post, I'm featuring one die from Top Dog Dies each month, and each Friday I'm sharing a different way to use the die. My hope is that even if you don't own that exact die, the ideas will translate to similar dies you do own.


I'm calling this a "stained glass" technique since some of the holes are filled in. Let's take a look ...


I cut the Heart Border Die in blue and, using the amazing dyer sheet technique, made sure all the pieces came out of the die. Then I cut the die in purple without using a dryer sheet and left some random hearts in the die.


When these are layered, it reminds me a little of stained glass, how some of the sections are filled.


I really like how this adds a see through element to the card without there being an empty hole. Definitely not rocket science, but just a little something different. The negative space was cut with the side of the Gift Tag Die Set. The transition from white to yellow looked a little abrupt, so I wrapped some gold thread through the area. When in doubt, add gold thread!

. I sure hope you don't mind, but I'm going to be cutting the heart border die at least two more weeks. Then I'm really going to have to move on to another die cut! Seriously.

Thanks for sticking with me on this one!
-Kelly

Friday, February 20, 2015

Functional Friday: BEST TIP EVER for DELICATE DIE CUTS!


Eeek! I'm SO EXCITED to share this amazing die cutting tip with you, I can hardly stand it!! First I'll share my card for another Functional Friday installment. In case you missed this post, I'm featuring one die from Top Dog Dies each month, and each Friday I'm sharing a different way to use the die. My hope is that even if you don't own that exact die, the ideas will translate to similar dies you do own.


This technique uses the tiny dies cuts as embellishments. Think of them like sequins or enamel dots. They make great filler, and in this case bridge the gap between the upper and lower sentiment. Let's take a look ...


I cut the Heart Border Die from some matte gold cardstock.


I dislike using tweezers for fear of bending or marking the paper, so I instead use the Silhouette Pick Me Up tool (note: the best tip ever is still to come, it's not this!) The Pick Me Up tool is wonderful for this type of job. The end has a sticky, gum-like substance that picks up the dies for you. While the tiny die is on the tool, I apply the adhesive and press it onto the card base.


The white Heart Border Die is used as a base for stitching. It goes so quickly since the stitches are as large as can be. 

   
I think it would also be fun to spell out someone's name, make a design, or even just place random stitches across the strip. So many possibilities. In this example, the die is the same color as the background to make the stitched letters more readable, but if you're stitching designs you could also use a different colored die for greater contrast.

OK, now for the BEST TIP EVER for DELICATE DIE CUTS.

If you've heard the one about dryer sheets, you can move on. But if not, you've gotta see what I learned from my crafty friends Helen & Brenda (thanks guys!!)


To start out with, it's crucial to use a Metal Adapter Plate with any intricate die, otherwise you run the risk of the cuts not being made. Here you can see the sandwich is the same as usual, except for the metal adapter plate being under the paper.
 

I'm guessing you've run into this scene before. The die comes out of the machine with all the paper still stuck inside the die. Ugh. When I remove the paper from the die (usually pull it out with a piece of tape) it's all in one piece and I need to run my fingers up and down the strip 7-8 times before all the tiny hearts fall out. Not the worst thing in the world, but it still takes a minute or so, and that can add up if you're making more than one card.


Here's where the dryer sheets come in. You want to layer 4 of them right on top of each other. These have already been used so you see the cuts on them. Yours, of course, will look like new dryer sheets. 


Now run the die (with the paper still in it) through the die cutter again, placing the stack of dryer sheets under the die and on top of the metal adapter plate. In other words, the dryer sheets will go where your paper normally goes.

Then prepare to be amazed. 

Seriously.

When you lift the die from the dryer sheets ...


 Did you just lose your mind?!?


I know I did the first time! It is so satisfying to look at all those pieces trapped on the dryer sheet that don't need to be coaxed out of the die.


I don't know how it does that, or who the mastermind is that figured this out, but it's a life-changer for anyone who uses delicate die cuts!


If you're only using the strip part of the die, it's also nice that all the pieces are trapped on the dryer sheets, and not invading all the nooks and crannies of your work space. Clean-up is a breeze!

Anyway, thanks so much for looking! I hope you get a chance to try this out soon if you haven't already. You may be monkey clapping in your craft space all weekend : )

-Kelly