

Hi Folks! I figured I should come right out and show you the photo of everything in this post right away, so you know what you're getting into. Hahaha!

All of these cards start in the same way ... running a panel through the die cutter with a rubber pad underneath and without one of the plates so it embosses instead of cuts. The die is the new Double Cut Alphabet Dies from Concord & 9th. Love, love these dies!! They have an outline as well as the actual letter, making for a ton of different combos. But before I cut all dies apart I wanted to explore this embossed panel concept. And more specifically, focusing on specific letters to integrate with the sentiment. Let's take a closer look!

For this card I smooshed ink onto the base and stamped "friend" from You are Here before I embossed it. This just made sure that the ink went on evenly. I knew where to position the "friend" based on lining it up in my MISTI from another panel that was already embossed. Very helpful!


Even on just a plain white background, these dies make an attractive embossed pattern. The outline feature of the dies make for a lot of extra bumps and valleys. I used 110# cardstock to increase the definition of the embossing. You really just want to touch it a couple times!
Pretty straightforward here ... I cut out my own heart and sponged ink through it around the "U" since that is part of my sentiment. Like the last card, I stamped "Love" from the Faith and Love set before embossing it so there wouldn't be gaps in the ink. Then I cut the panel on an angle and attached it to the card base.

This card also uses the "U" for the sentiment, but this time I added "Miss" from Fill-in Phrases. I wasn't sure about heat embossing it and then dry embossing it afterwards, thinking that the white may crack under the pressure, but it held up well.

Because of the meaning of the sentiment, I removed the "U" with my exacto blade. So it's actually missing! I cut it from the back of the card as well so you can see through the entire card. Here's where the outlines come in handy. Adding the white "U" outline not only ties in with the white "Miss" to make the sentiment readable, but it also hides my imperfect cutting. Win, win!

This one is a challenge! Can you figure it out!?
I'll give you a hint, it's for my good friend BRENDA who just drove 3 hours to go to the Green Day concert with me on Tuesday.

You start with the letter that has the sequin attached to it, and then follow the sparkly gold thread to each of the next letters. B-R-E-N-D-A. Get it? Again, something that couldn't really be done without the outline feature of these dies. The sentiment "you are a rare find" from You are Here is really what gave me the idea for this card design. I was thinking of how to make a sentiment that you had to find, by putting all the letters together. Like a secret message! Looking forward to giving it to Brenda and seeing if she can figure it out : )

This card mixes up the order of steps. Instead of inking and stamping everything before it gets embossed, I elected to stamp the "Lucky" sentiment afterwards to play up the cool pattern that is made from the ink not getting into the valleys. This stamp is particularly useful to highlight this technique because it's so thick. This got me thinking, and is how I came up with the final set of cards ...
[The rest of the sentiment is from Lucky. I stamped a different background from Background Basics on the "R" before adhering it onto the panel.]
Note: a MISTI was super helpful here! It also helped that the blocks are exactly 1" (thank you concord & 9th designers!!) so moving your card after stamping was really straightforward. No complicated math going on!

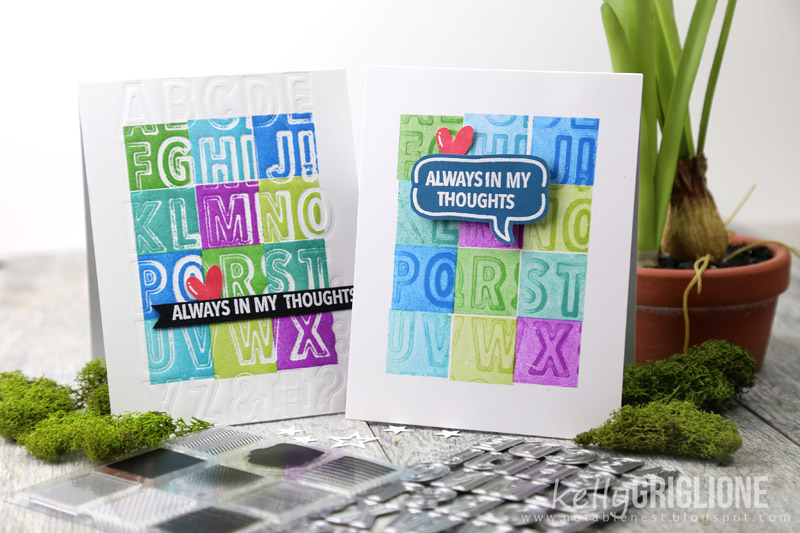
It was really late at night, but I just couldn't leave the craft room until I tried out some more color combinations. Cool colors, warm colors, rainbow colors, so many different possibilities!

I chose this sentiment (from You are Here) because I thought the letters represented various thoughts that would go through your head. The cute heart and the speech bubble are from Faith and Love. Really happy with how these turned out, and that I got double the amount of cards (except the warm colored card, since that was made before I thought of second generation stamping).
Well folks, that's the end of my scheduled posts for Concord & 9th, she says with a tearful eye. It was SUCH a pleasure guest designing for them in the month of March. Like their other releases, these sets are so well designed, trendy and just plain fun! A big thank you to them for inviting me to guest design, and a big thank you to you for checking it all out!
-Kelly
The products featured in this post can be found through the following affiliate links:


Awesome cards ! The one for Brenda is terrific !!
ReplyDeleteYou always amaze, Kelly ... these are all fantastic! I'm especially taken by the colour block ones ... bright, vibrant, fun ... a fabulous design for so many occasions! Thanks for all your inspiration with C9 goodies! Hugs, Anita :)
ReplyDeleteI really love these! Especially the first one with the and the last set, really especially the last set, that's my fave. So many great ideas here thought!
ReplyDeleteThese are all so clever, Kelly. You almost need two sets of dies so you never have to cut them apart.
ReplyDelete