Thursday, October 17, 2013

Two Cards with Bold Sentiments

Hi folks! My turn at CAS-ual Fridays Stamps today.

 
I love using simple and bold sentiments, especially when you have something else happening on your card. The "something else" on this card is a diamond die, with a design/focal point made from left over diamonds in patterned and plan paper. The bold sentiment is from the CAS-ual Fridays Stamps Bold Wishes set.


This card uses a pool noodle sliced off (with a bread knife) and used as a stamp. ETA: a pool or swim noodle is one of the best things you can buy at the dollar store for kids ... it's a 5 foot tube of plastic-y-styrofoam fun, typically used for kids to keep afloat, or to hit their brothers with. Since it's large, and only $1, people have found lots of ways to alter its use. Just typing "swim noodle crafts" I found a list of 29 different uses http://www.creatingreallyawesomefreethings.com/23-things-to-do-with-a-pool-noodle/

The bold sentiment is from the CAS-ual Fridays Stamps Woot, Woot set. A few sequins and a set of crossed staples round out the embellishments for a pretty quick card once you've mapped it out. .

If you haven't already, you may want to check out the new release at CAS-ual Fridays ... lots of fun stamps and dies available now!

Thanks so much for looking!
- Kelly

Friday, October 11, 2013

CFC #117 - Stitched and Colored Cork


So excited that you can actually sew on cork! AND you can apparently color on it too!


This week's CAS-ual Fridays Challenge is to use real or faux stitching on your project. Up for grabs is a wonderful gift certificate from SimonSaysStamp.com!


I was blown away at how intense the colors are using the inexpensive Reeves wax crayons (here's the first project I used them on). Wasn't sure what I was expecting when you color on cork, but certainly not this! There are four reds on the heart. The only reason I tried it is because I wanted to enter some of the fun Moxie Fab Challenges ... I started with the metal/wood/cork challenge, and decided to add the color media challenge as well.

ETA: Also wanted to mention that I switched to a thicker thread so it would show up better, and loosened the tension so the thread wouldn't get pulled into the cork.


I started out with a plain card base, but I wanted to take more advantage of the upside-down scallops that mimic the top of the heart shape.


So I cut them, but wasn't too sure how it looked on top. [There's even a prior version where the scallops are cut off in the middle on each end. The Pattern Play class at online card classes reminded me to make sure your pattern is centered before you cut!]


So that's when I backed the humps with the red paper to still give the heart-shape feel while maintaining the basic card shape. So in love with this double-sided paper too. It's from the Studio Calico Yearbook line (Most Likely is the pattern). The rounded square is from the new CAS-ual Fridays Stamps Funky Tag Die that just went on sale today.

Can't wait to see your stitched creations in the CAS-ual Fridays Challenge gallery!

Thanks so much for looking! 
-Kelly

Thursday, October 10, 2013

Funky Square Tag


I am currently obsessed about making my own envelopes! One day I will get up the courage to show you my hoard of patterned paper. In the meantime, I am having a blast going through my stash and making the packaging of the cards we spend so much time on look fun too. 

First impressions, right?

The funky square tag die in the new release for CAS-ual Fridays just happens to go PERFECTLY with my latest quest to be pretty on the outside. My friend Sarah's birthday is coming up, and it's become a tradition that we take each other out to shop at Hot Mama for our birthdays. (If you haven't been to a Hot Mama, it's not a maternity store, and not a sleazy store, just fun clothes for us Mamas). Anyway, since I'll be delivering her card in person, I can create a cute tag with her name on it for the outside. 


For making envelopes, the double-sided paper is awesome because you have an instant liner! This is from the American Crafts Amy Tangerine Yes, Please line. The ribbon that holds the tag on the other side also hold the flap down in the back (since there is no "glue" to lick on the flap). I've also just used cute washi tape to hold the flap down.


Here's the funky square tag as an instant Christmas present tag. Again, using the double-sided paper makes it double-fun. Since there's a hole on the top for the tag, this is a great opportunity to make an easy bow. Pull the ribbon through the hole and leave a loop, wrap it around the tag hole, leave a loop on the other side, wrap it around the tag hole, etc., etc. Done!
  
Please check out the other sneaks from the rest of the CAS-ual Fridays Stamps Design Team. The two stamp sets (Spooky and Amber Waves) and the three dies (four petal, funky round tag, funky square tag) will be available tomorrow at CAS-ual Fridays Stamps!

 Dana

Thanks for looking!
-Kelly

Wednesday, October 9, 2013

Funky Round Tag Fri-Dies - Fall/Christmas Bouquets


I'm on a mission to use more of my stash, and one of my targets has been a small collection of wooden spools I've picked up at flea markets. The asterisks from the CAS-ual Fridays Exclamations set will now have a die available from CAS-ual Fridays Stamps that I thought could be turned into a fun, funky, little flower.


The fun part of this project is getting together lots of patterned paper scraps to make the flowers. A few plastic disks for the centers, and a wire through the layers, completes the flower.


I chose fall colors for this bouquet and will keep it out for Halloween. Another Studio Calico paper is wrapped around the wooden spool base. Once I figured out what I was doing, it really couldn't have been easier to put together.


So easy that I had to go for the next holiday too, using the Crate Paper Peppermint line. 


Unlike the Fall/Halloween bouquet, this one uses a double layer of the asterisk die for a fuller, more traditional, flower. The centers have a punched sunburst shape, and some have Twinkle Goosebumps (amazing light reflection) on top.

 I left the vintage label on top of the green, paper-covered spool.


Since I die cut more flowers for this one and had a fuller bouquet, I stacked two of the spools together to make the arrangement taller. Love how these turned out, and how easy the dies are to use.


And finally, a quick tag that uses the round tag die. Stamps are from the Spooky set, which has already been released in the store due to the quickly approaching holiday!

Please check out the other sneaks from the rest of the CAS-ual Fridays Stamps Design Team:

 Dana

Thanks for looking!
-Kelly

Tuesday, October 8, 2013

Four Petal Fri-Dies Sneak


A hydrangea!
 
The first CAS-ual Fridays die released this month is a set of 2 four-petal dies. Not exactly a hydrangea, but could certainly be turned into one.


 Recently, I've had several conversations with people about using the Silhouette vs. traditional die-cutting. With all the versatility in die-cutting provided by the Silhouette, I still have a soft spot for traditional metal dies. My last craft purchase was $84 worth of metal dies (thanks, Helen!!)


Aside from the ease of use, I LOVE the rounded edges that metal dies give. It's a small detail, but one I love. And this particular set of dies has another advantage since they are outline dies ... an extra ridge!


The insides of the flowers are stamped with the coordinating four-petal flowers from the Christmas Carol set, in the smaller size. The sentiment is from Shenanigans.
 
Please check out the other sneaks from the rest of the awesome CAS-ual Fridays Stamps Design Team:

 Dana

Thanks for looking!
-Kelly

Monday, October 7, 2013

Amber Waves Sneak Peek


I was missing a good, fall thank you set. Happily, I got one in the mail a couple weeks ago! The other stamp set released this month for CAS-ual Fridays is Amber Waves.


The wheat image is a really great focal point stamp in this set. You can get more depth by varying the colors on the seeds of wheat by dabbing small ink pads on your stamp. Originally I had the red going on the stems, so I just went over them with a fine-tip brown marker after stamping.

The background edges are made with the grains of wheat stamped in alternating directions in shades of brown. It's a good way to make sure the background coordinates with the focal point : )

Please check out the other sneaks from the rest of the CAS-ual Fridays Design Team:

 Dana

Thanks for looking!
-Kelly

Sunday, October 6, 2013

Spooky Sneak Peek - CAS-ual Fridays Stamps


Another awesome release from CAS-ual Fridays! This week we are debuting 2 stamp sets AND 3 dies. The Spooky set is, as you may guess, all about Halloween.


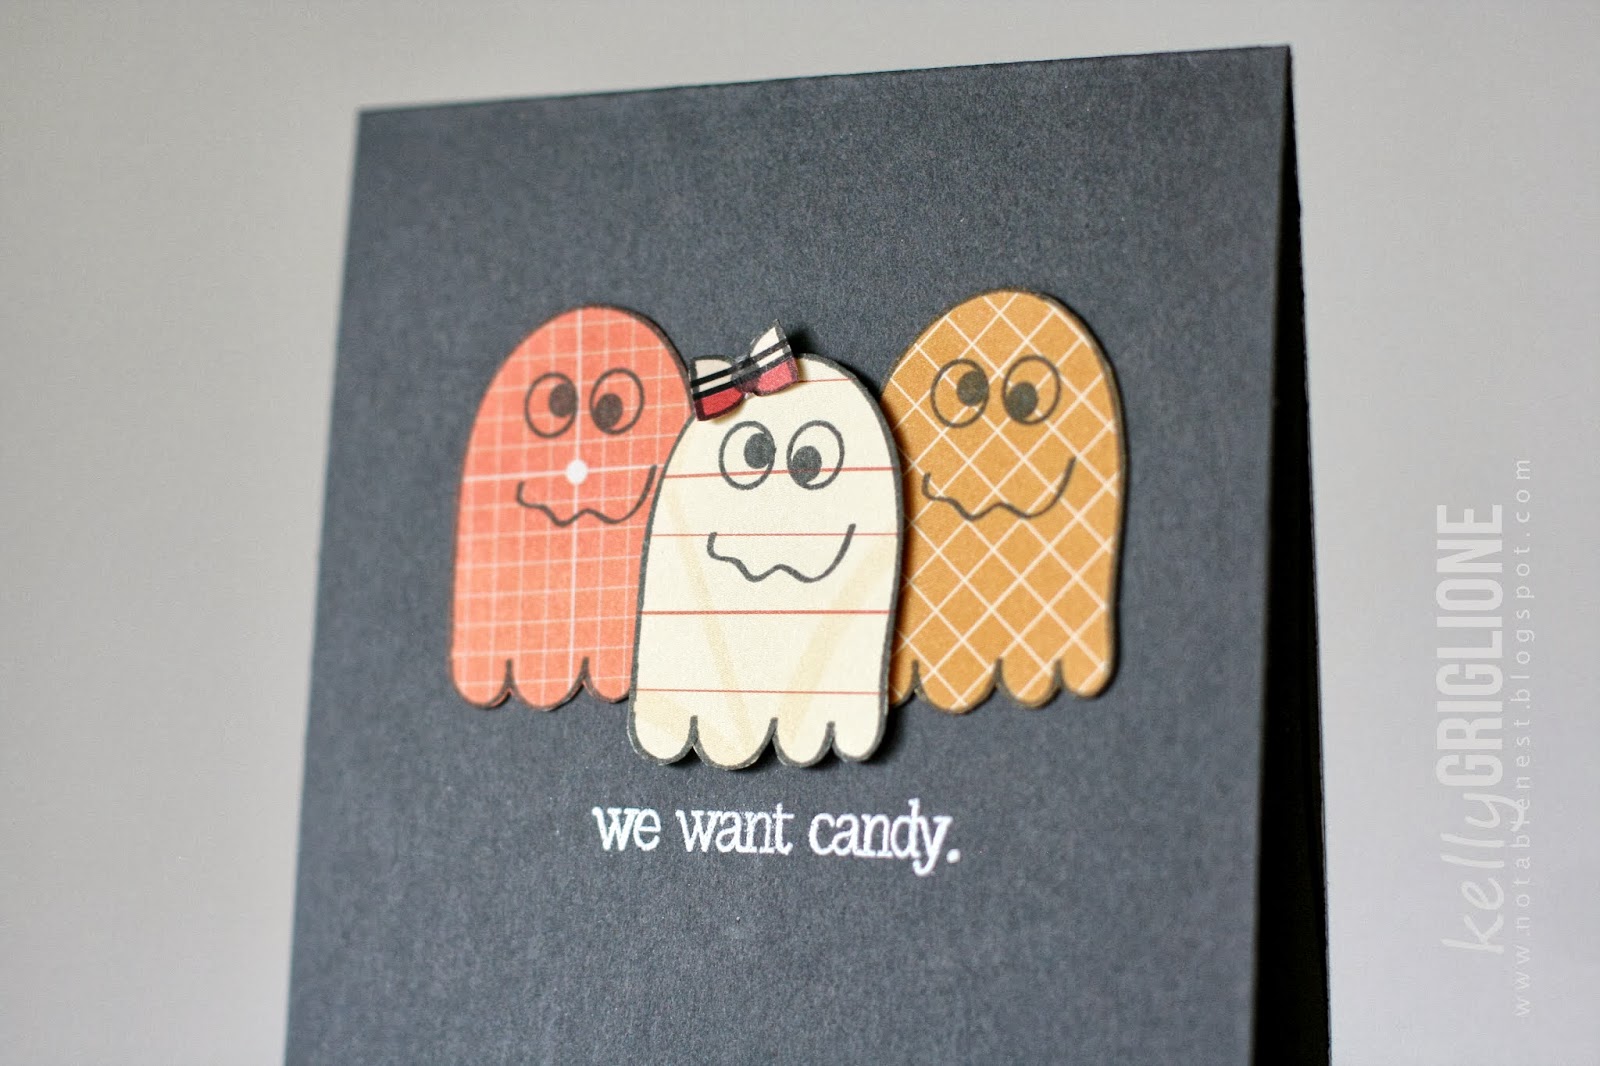
 A trio of ghosts stamped in different patterned paper, now how easy is that? And their matter-of-fact sentiment. Done!


Here's the same ghost, only this time they're "invisible" and don't have their mouth or scalloped bottom showing. Different look than the first card.


The graveyard wall is from an already-released set, Brickworks. Still on my quest to make a dent in my patterned paper stash. Every card now has a "liner" inside. Still really happy with that look.


This one uses the spider included in the set. Just stamp the spider, add some web lines with a marker, and put your sentiment on. Done!


Here's more patterned paper on the inside.  It really makes me happy : )

Please check out the other sneaks from the rest of the CAS-ual Fridays Design Team, and stay tuned over the next few days!

Virginia
Sylvia
Piali
Lynn
Jingle
 Dana
 Angie

Thanks for looking!
-Kelly