Friday, February 28, 2014

CFC #129: Encouragement Card in 3D


Welcome to the first CAS-ual Fridays Challenge in the new format! I have to say your excitement for the new team and new format announced this week is totally infectious! Thank you so much for your incredible response; you guys are the best : )

This challenge is to use at least two shades of gray in your CAS project. I don't know about you, but gray is one of the first things I've been reaching for this past year, so this is one challenge I happily accepted.


This card tells the story of a feisty little flower who wasn't going to let a brick wall stop her from growing. Not only growing, but flourishing. She found a crack, and believed she could.


The 4 Petal Fri-Die makes this flower with a layer of textured cardstock and tulle. The pearl secures the floral wire that goes through both flower layers with a dab of glue inside. The floral wire is then bent to form the leaves and stem.


After going through the wall, I attached a penny to the floral wire to make sure the flowers stands nice and straight, and also to help weigh the top of the wall down.


The brick wall is made with the Brickworks stamp set. Stamping was fun because you don't have to worry about getting a great impression. In fact, you probably want a crummy impression to make the bricks look more worn. After folding the card, it still looked too neat and tidy. So I did two things: 1) stamped and cut individual bricks to layer on top of the wall for more dimension, and 2) sanded the sharp corners and edges. 

The sentiment on the banner is from Calm and Gentle.


 Here's a view of the top of the wall before it's locked into place. I left a tab on the end to help it stay closed and avoid any gaps.


Here it's folded flat for mailing.


Originally I was going to have a cute little animal or something sitting on the wall. But when I thought of a flower, and the inspirational message that would go with something flourishing despite their circumstances, I knew that was the way to go for a much more meaningful card. And there you have it!

You're not going to want to miss the awesome inspiration from the talented new Design Team! 
 

Also, you've got a whole month to see where this challenge takes you. I sure hope you'll add a project to the gallery!!

Thanks for looking!
-Kelly

Thursday, February 27, 2014

Fusion Challenge: A Tribute to the 1980s


 Well Hello There! That's exactly what I said when my mom showed me these gold doilies from the 1980's that she found at a garage sale for 25 cents. There were probably no white doilies in the 80s. Everything had to be gold or shiny.


 I cut the center of the doily out and layered that under a speech bubble cut from Studio Calico Darling Dear paper. The gem in the "o" is a nod to the glitzy doily. After putting it on the card on my way to following the Fusion sketch, I really kinda liked it as it was.


I had more Studio Calico paper out for the card, so I cut another piece and stuck it on the inside. Really liked the contrast of the graphic lines with the frilly gold doily. But, this is not really the sketch, is it? So we must press on : )

  
Although this is not exactly like the sketch either, I took my inspiration from the curve at the bottom. Cutting along the paper's jagged lines gives a similar effect. I wanted something luscious and white to peek out underneath, but the plain white cardstock left the card feeling too top heavy. So I took some white fabric (also from "cousin" Helen), folded it lengthwise, and gathered it under the patterned paper for some volume. Yep, that's it! Still white, but no longer top-heavy. And it's easily made flat for mailing since it's fabric.

Image Source

Reminds me of those *fabulous* prom dresses, also from the 1980's, with the asymmetrical ruffle on the bottom!
 
As a reminder, here are the guidelines on the challenge:

1. Play with just the sketch challenge.
2. Play with just the inspiration photo challenge.
3. Or you can create FUSION by combining BOTH challenges into one card.
4. Use the challenge graphic and link back to Fusion in your post.
5. Please read the other considerations on the Our Rules Page before playing along.

Here are some fabulous cards by our design team!


WinnersWill be chosen by all of our teammates in two weeks. We each will choose one favorite. The winners will be announced at 4 am (PST) in two weeks!


Thanks for looking!
-Kelly

Tuesday, February 25, 2014

Papertrey Ink February Blog Hop

(Please go here or scroll down for today's CAS-ual Fridays announcement)


If you've come from the Papertrey Hop, welcome! For my inspiration of gold and white, I focused on the lovely little lamb with the daffodils on top.


I used my new strip stitch die. When I came out I knew I had to have it ... SO many possibilities for this one. I kept the stitching really simple to fit with the card, just long vertical stitches of gold over the length of the strip, and then a few horizontal gold stitches on top for interest. I like that it also makes a "cage" for the top flower.


My favorite detail ... threading the gold thread through the tiny loop in the "Y". Can I tell you how excited I was when that worked out?!?


 The inside is lined with some happy Spring paper from Pebbles. I chose white for the sentiment (Papertrey's Wonderful Words: Thank You die) to keep it light and airy. Since it did blend in with the background, I made the tops of the letters extend off the card base.
 

Lastly, that luscious gold thread is a recent treasure. It's from my crafty "cousin" Helen, whose mother brought it over from Greece ages ago. According to our friend Rene, everyone needs a cousin Helen in their lives. She exudes craftiness in everything she does and is our go-to resource for "how do I ..." questions.


She even just installed a sand blasting chamber in the room she reclaimed from hubby in the basement. For etching glass with Silhouette Vinyl. That's some serious stuff!

Thanks cousin Helen!!

And thanks all for stopping by! See ya on the hop : )
- Kelly

New Girl Friday Team Announcement + Prizes!

 So did everyone see "the announcement" at the CAS-ual Fridays Challenge blog? Be sure to check it out if you haven't. There are quite a few changes going on. Very exciting!! Today, Michele is announcing the next 3 designers of the new CAS-ual Fridays team. Since I'm posting about this today, you may guess that I'm one of the designers. And you would be right : )

I'm very thrilled to stay with CAS-ual Fridays and play in the new format! Like the last team, I know that this team will turn out some amazing, pin-worthy work, challenge after challenge. Feel free to read the Q&A below, and leave a comment ... Michele is going to choose a random commenter from each of the nine Girl Friday's blogs to win a CFS stamp or Fri-Die of your choice!


1. How long have you been a cardmaker, and how were you first introduced to it? 

Like so many others, I got started with a Stampin' Up! party at a co-worker's house. That was way back in 2000. Here's the card I made at that party : ) Check out the raffia, inking around the edges, and my initials/date on the front ... all things I haven't done in awhile. However, I was surprised to find some old things that are new again, like vellum, ink spatters, and selective coloring of one image


2. What color are your toenails painted right now?  
Oh how embarrassing ... I am so bad at taking care of the non-essentials. They are a worn-off shade of bronze. I will spare you all, and instead share a photo from when my toenails were painted in the Spring (I'm the toes in blue on the bottom). This was from a girls weekend with my high school friends. Even though we're a long way from high school, we still get together in a different city each year for the weekend.  


3. If your family locked up your crafty supplies for an entire month, what would you do instead? Cry?!? No, I'd probably get a heck of a lot of things done. I have a TON of wonderful flea market treasures that I'd like to refinish. Here are some goodies awaiting attention in my garage. The two cast iron folding chairs from the 1910's have been stripped and repainted white, and now the seats just need to be recovered. The wooden headboard against the wall is destined for something great ... I just need to figure out what that is! I would love to turn the round, wooden wheel laying on its side into a spinning photo display (that one would definitely take some thinking to pull off).
  
 
4. Favorite thing to order at Starbucks: 

Please don't think I'm strange, but I've only been to Starbucks 2-3 times. I'm not a coffee drinker, so I ordered flavored hot chocolate on those occasions. Speaking of, I tried the Salted Caramel Hot Chocolate at Dunkin' Donuts last week after sledding with the boys. DE-lish! Unless you're opposed to drinking chocolate bars. Then you probably wouldn't like it much : )


5. You've reached your destination but just as you are turning your car off, a song comes on the radio and you are sooo happy to hear it that you sit in your car until it's over(singing along is optional *wink*). Name that song:  

I will stay in the car for ANY Green Day song. Here's a picture of me (far right) and two of the best neighbors you could ever ask for at the Uno, Dos, Tre concert from last year. My throat was sore the whole next day. Singing along with Green Day is definitely NOT optional. At all.


Thanks so much for stopping by!
-Kelly


PS. it just hit me how strange it is to have photos of an old card, toe nails, flea market treasures, Dunkin' Donuts, and the Green Day Concert all in the same post. Great set of random questions from Michele!

Saturday, February 22, 2014

Lego Valentines


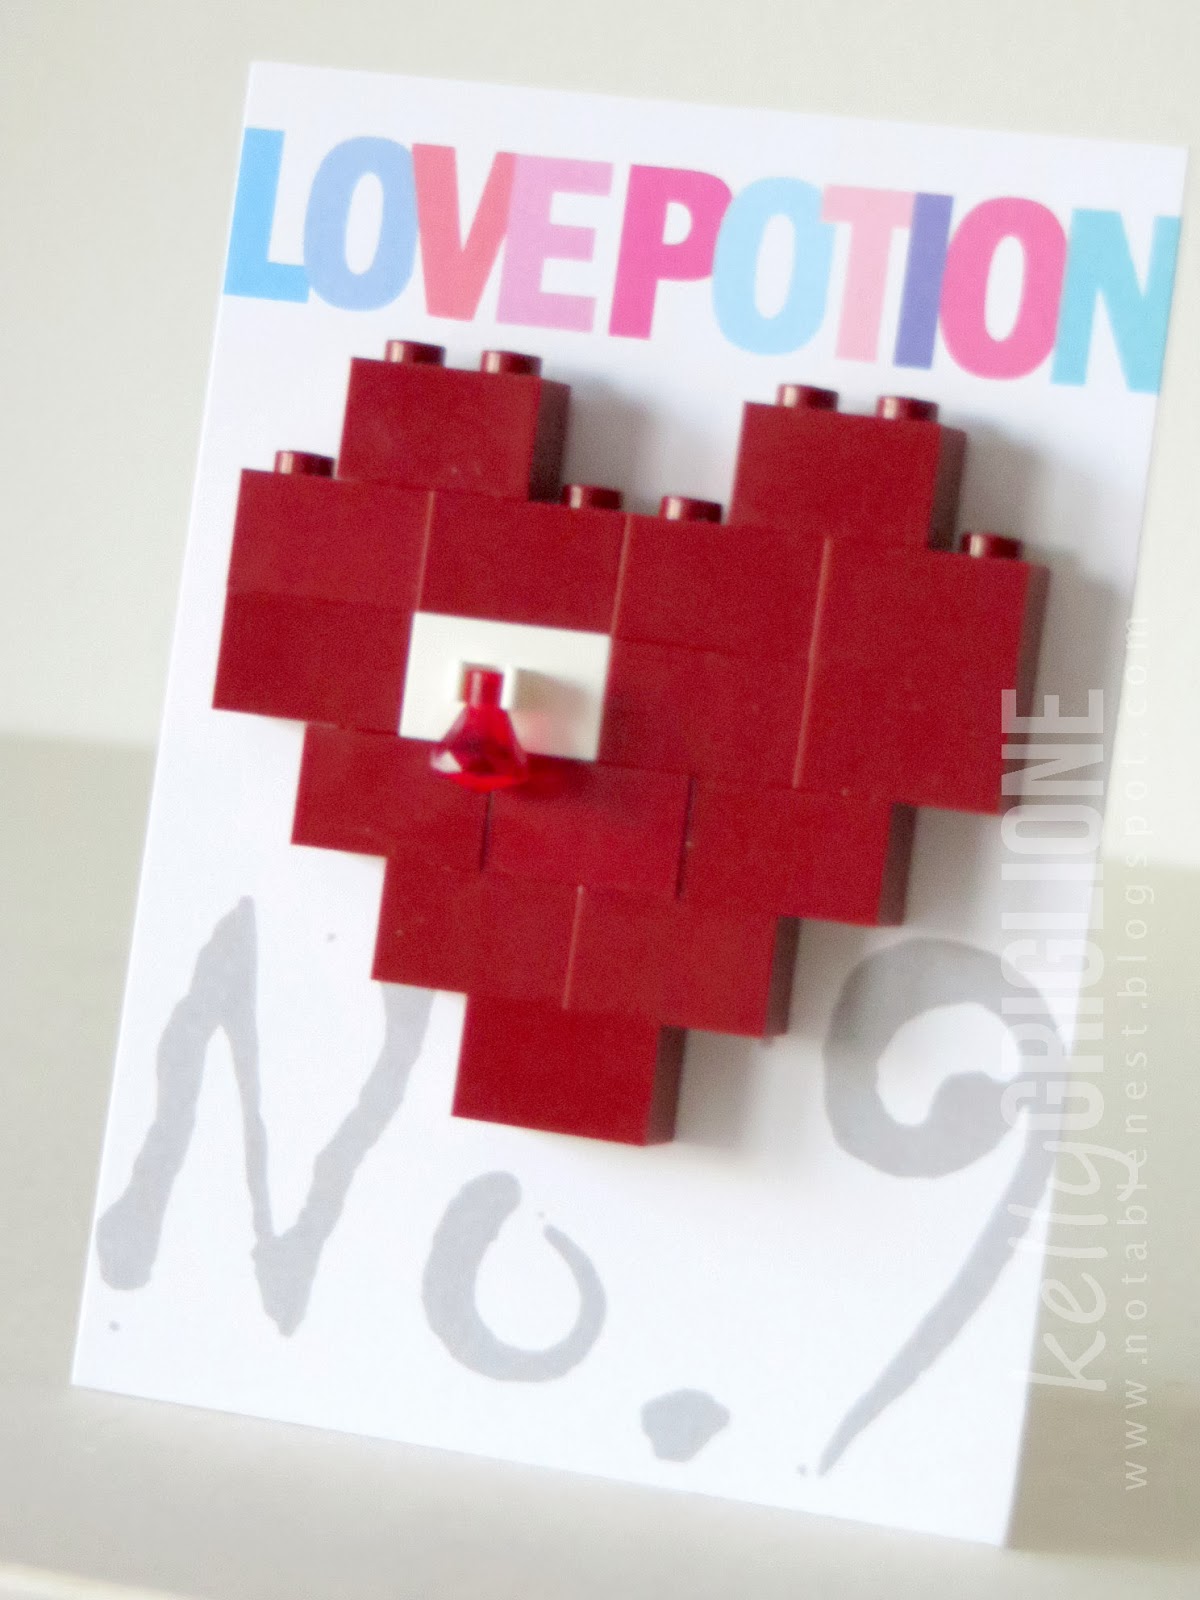
Excited to share the Valentines we made this year ... out of Lego bricks! These Lego Valentines were really fun to think up and put together. I've got a bunch of photos to share with you : )

Image Source
 
If you haven't been to a Lego store (what?!?), on the back wall they have a glorious set of containers where you can grab specific Lego bricks and fill a container for $15. This is great when you need to make multiples of things. I've used this Pick-a-Brick section for birthday party favors, and now the kids' classroom valentines.

But there is a trick.


The Pick-a-Brick containers are round. Lego are square. Efficient packing of the containers to maximize your Lego bricks is thus the challenge.

You could just grab the Lego bricks and casually fill your container. Or, you could be a Crazy Lady and stand in a corner of the Lego store for an hour and 20 minutes connecting bricks and packing that container so tightly that the air-to-brick ratio is less than 1% (NOT scientifically proven).

  
In that case, this is what your container would look like.


And these would be the amount of Lego bricks you come home with for your valentines. Between the large and small container, I was able to get 846 1x2 bricks, and 100 red gems. $24 in total.


The secret is to first connect all the bricks in columns, minimizing the air space. Then start adding the columns to your container around the outer edges, working your way inwards. Any super small pieces, like the gems, can be added afterwards to fill in any gaps. Usually, you can get away with not having the lid fit perfectly. They will tape it shut at the register so it doesn't spill all over.


For the valentines, I had a general idea of the heart shape before I went to the Lego store. But you really have to be creative on your feet because you never know what bricks are going to be available (I did call ahead to make sure they had red 1x2 bricks). After seeing the white 1x2 bricks with the prongs coming out of the side, and snapping the red transparent gem upside down into the prongs, it hit me that it could be a love potion! I was so excited!!


To make the Lego hearts, you will need:
(15) 1x2 red bricks
(1) 1x2 white brick with vertical clip
(1) red diamond jewel


Then you assemble the bricks like this.


Well, "you" don't assemble them, your kids do! That's the beauty of these : )


 It took about a half hour for both kids to assemble the 50 valentines.


Then I made a printable on 110 lb cardstock to hold the Lego heart. I changed the colors of the letters in "Love Potion" for girls vs. boys, according to my kids' direction. I get a certain amount of free color prints at my library, which is awesome, but unfortunately the color printer was off slightly. They still turned out OK, just different than I designed.  


 To attach the Lego hearts to the Valentine card, I used a tiny bit of adhesive from a tape runner. I wanted the kids to be able to remove the Lego heart easily.


The kids just loved how these turned out and couldn't wait to pass them around!


 Since I'm still in love with my We R Memory Keepers Envelope Punch Board, I decided to make envelopes for the Valentines. I sized the Valentines so that I could use envelopes made from 6"x6" sheets of paper (getting 4 envelopes from a 12x12 sheet of paper). The kids wrote names on flags that are wrapped around the envelope.

(is it entirely lame that my shoulder hurt the day after making 50 envelopes?!? At 6 punches per envelope, that's 300 punches, after all.)


Obviously, since the Lego bricks are dimensional, the envelopes weren't flat. That's OK. I just put a bit of adhesive under the top flap, without adhering the sides closed.


And there you have it ... somewhat inexpensive valentines that are different, timely (with The Lego Movie that was just released) and could potentially escape being tossed in the garbage two weeks later : )

Thanks so much for looking!
-Kelly

Friday, February 14, 2014

CFC #128: Later 'Gator


We have some sad good-byes to fellow teammates on the horizon in the CAS-ual Fridays Challenge since the end of the term is coming up. Before that happens, though, we have one last challenge, and this one is to make a long card (2x4, 4x6, etc). The challenge is only one week long this time, so don't delay!

The talented winner will receive a prize from CAS-ual Fridays Stamps!


I'm not a fan of drama or mushy good-byes, so I have to keep things light-hearted here. Later 'gator came to mind, so I cut an alligator on the Silhouette.


He's stamped in a casual manner with CAS-ual Fridays zig-zags. The card is indeed long, clocking in at 6" x 12".


The triangle patterned paper I. CAN'T. PUT. DOWN. and have seriously used it on the last 5 projects I've made. It's from the AC Lucky Charm line. So fun and fresh. The card base is from the same line too. Love the yellow with white polka dots on the back.

You will see a lot of this yellow/aqua paper in the future.

I own many, many sheets of this paper.

If anyone cares, take a guess of how many sheets in the comments and I will let you know if you are close.

Anyway, I can't wait to see your long creations in the CAS-ual Fridays Challenge gallery! Stop by to see some inspiration from the Design Team, too. Thanks so much for looking! 
-Kelly