Monday, February 20, 2023

Fun Shaped Cards - The Way of Plants by Colorado Craft Company


Hi Friends! What a fun release just hit the shelves from Colorado Craft Company - the Way of Plants offers three different LARGE cacti and succulents for your coloring pleasure! I was so anxious to play with these, as I thought they'd make perfect candidates for shaped cards!

I'd like to share three different types of shaped cards with these beauties:


1) Shaped Card Base - A straightforward way to make a shaped card is to start with a typical card base, place your large die so it slightly goes past the fold of the card base, and then die cut your base in the shape of your image.


Since this leaves you with a flat top where the fold is, I usually make another die cut of the image and adhere that to the card base.


This beauty is the succulent from Ready Set Grow - aside from the giant bloom. how awesome is that detail on the pot?! You can of course stamp the pot on white paper and color it, but if you want a quick pop just emboss all that detail on a colored paper.


Lots of space for you to add your color in many different ways on the succulent. Not a lot of fuss. There are also a lot of sentiments (and dies for them) to choose from.  


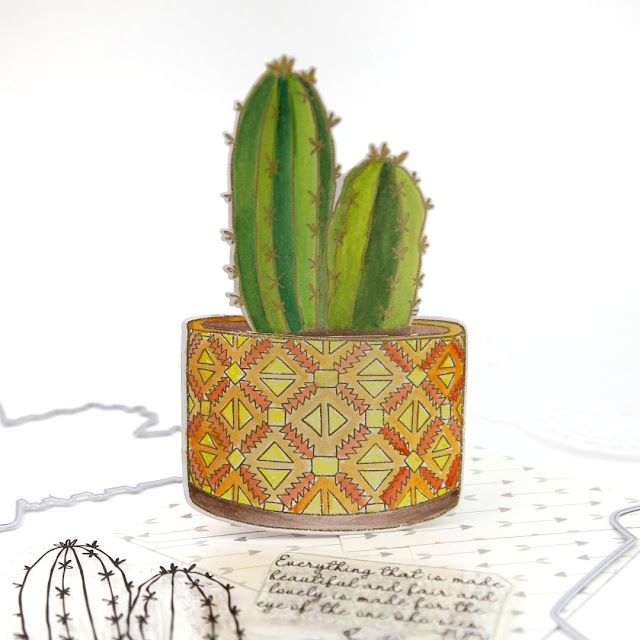
2) Easel Card base - an alternative to the shaped card base is to add an easel to the back of your large shape. This gives you a card that stands but does not open. 

Then if you want to kick it up a notch ...


... make the easel part of the card itself! That's right, we've literally planted the cactus into this pot, lol!


This may give you a better idea of how it works - cut a slit in the planter, put the cactus and strip of dirt with sentiment through the slit, and add a wider piece to the bottom of the easel so you can't pull the cactus completely out of the planter.


This shape is the cactus from Can't Touch This. Another fun design for the planter. This time I colored the design, but in a very loose manner. The little arrow shapes would be difficult for me to color in an efficient manner, so I just ran my paint brush in a straight line through all the spaces.


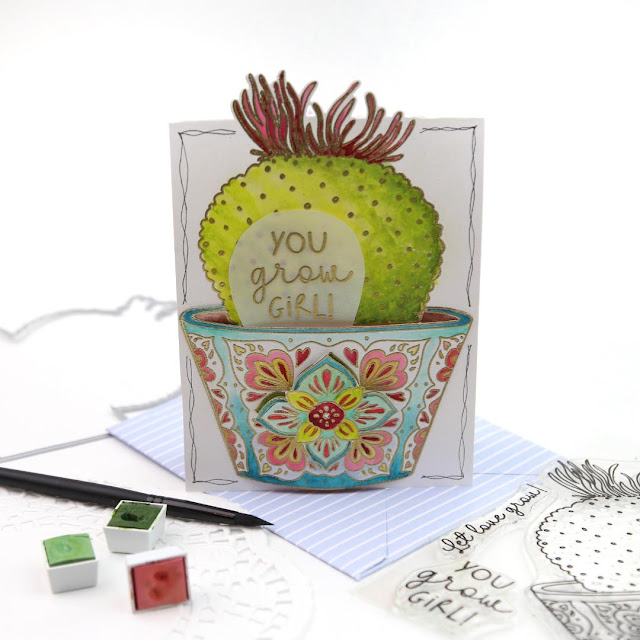
3) Partial Shaped Card - my third and final type of shaped card is one that's only partially cut, like the flower petals on the top. This is a great method to use when your shape is larger than an A2-sized card.


This card was made by stamping the cactus on the card base, lining up the die, and then place the fold on the end of your cutting platform. This will let you cut out the flowers, and then when the platform stops the cutting will also stop, so you've only cut out the flower top. 


This cactus is from the Grow Girl set. Yet another beautiful planter base! For this one I did go for coloring all the different sections. I ended up not liking the center colors I picked (green, which was too much with the cactus color) so I colored another section and just adhered it on top. To make it look intentional, I popped it up so now it's a cool medallion element.

I did want to mention the 3D nature of the planter ...


To get this dimensional look I cut out another planter, adhered it with a strip of foam tape going down the middle, and then glued the sides flat to the card base. It's a small detail, and doesn't add more bulk since it's just a regular foam square, but adds to the dimensional feel of the card.


I embossed the sentiment in gold on vellum, cut it out in a cactus shape, and "planted" the sentiment along with the cactus. 

I'm happy to say I've got a prize to give out to a random commenter on this post! One random commenter will receive a stamp and die set from this release!! Just leave your comment through Feb 23rd and the winner will be picked and announced on the Colorado Craft Company blog on Feb 25. 

Also, there are a few others who are sharing cards from this release, AND are offering the same prize opportunity! Let the festivities continue! Please stop buy and see what they have to share:


Also, great news, free shipping (and $6.99 international shipping) is available today and tomorrow! No coupons needed, it will automatically be deleted from your cart!
 
Thanks for stopping by!!
- Kelly

If you'd like to check out the products in this post, here are affiliate links that will take you there. Thanks so much for your support!

Can't Touch This

Grow Girl

Ready Set Grow


Wednesday, February 1, 2023

Altenew February 2023 Boho Chic Stamp, Die, Stencil & More Release Blog Hop #1 + Giveaway ($300 in Total Prizes!)


Hello Friends!

There's a brand new Altenew release on shelves now, and I have to say two of the sets are instant favorites for me! And now that I think of it, neither of the sets involve stamping ... lol, how crazy is that?!? 


You may have come from the one and only Jennifer McGuire, but if not, feel free to stop at the beginning with the Altenew Blog!


Best way to get a no-line coloring look? Don't make a line in the first place!! This new Swamp Buttercup Stencil and Die is ridiculously beautiful with lots of details and shading, and it's all created through the layered stencils. Amazing!


I added some sequins to the center of the flowers instead of scattering them around the card for a bit of bling. 


The background is subtle, but a nice addition. It's from the Patchwork Tiles Stencil and Stamp that is visible in this photo. The set comes with a grid of squares so you can make a patchwork background, but you can also just use the ornamentation without the squares like I did here. Options are good!


You can certainly just purchase the stencil and have one heck of a craft tool, but the die is nice if you want to easily add backgrounds to your card. This is one shape that's not at all straightforward to fussy cut yourself, so I wouldn't feel bad buying the coordinating die.


The previous card is made with just stencils (and a die), now this card is just made with just dies! The Boho Vases die set is a real workhorse for your card-making endeavors! Just one cut of the three vases and three plants will fill your entire card!


The vases, OMG!! All the detailed cut-outs AND debossing lines make such intricate designs that really shine when you use metallic papers. Kick it up a notch and add a second layer underneath that you can use different colors to further play on the patterns. 

 At first I was scratching my head on how to do this easily since there's not a second solid die for each vase. But then I thought why don't I try cutting a really thick piece of chipboard. Perfect! Without enough pressure to cut through, I was left with debossed lines where all the circle are. I just cut each vase out along the debossed outside lines, and then picked which holes to color based on the debossed design in the chipboard. Cover that with the gold cardstock I initially cut and it's a completely customized vase!


Then just cut a few different shades of leaves and pot your plants! You may notice the subtle stripes in the background, and the striped die in the photo. That's the work of another new item, Rattan Stripes Die. Instead of using the stripes horizontally or vertically (it's wide enough to offer either option for an A2-sized card), I used them diagonally.


Giveaway Prizes:

$300 in total prizes! To celebrate this release, Altenew is giving away a *$100 gift certificate to 1 lucky winner and a $20 gift certificate to 10 winners! Please leave a comment on the Altenew Card Blog and/or each designer’s blog post on the blog hop list below by 02/07/2023 for a chance to win. Altenew will draw 11 random winners from the comments left on each stop of this blog hop and announce the winners on the Altenew Winners Page on 02/08/2023.

*The winner of the $100 gift certificate will be chosen from comments left on the Altenew blog. 


I'm now happy to send you to the blog of a dear friend, Virginia Lu, who has something beautiful to share!

You are invited to the Inlinkz link party!

Click here to enter

Thanks for stopping by!
-Kelly

Supplies used (affiliate links at no additional cost, thanks for your support!)

Collection Containing the Boho Vases


Boho Vases