Wednesday, May 20, 2020

Catherine Pooler Fly Daddy Hop - Went Nuts Making 9 Cards!!


Hi friends! Goodness, I had a REEL fun time with the new release from Catherine Pooler Designs, and I can't wait to share what came out of the craft room! Lots of fishing goodies for the perfect Father's Day and masculine birthday cards, as well as some patterned paper, sentiments, dies, and, well, a little bit of everything.

You may have come from the blog of Adelina Starace, but if not, feel free to start at the beginning with Catherine Pooler.


Yep, I went a little overboard here : ) Let's cast off with the fishing goodies!


Here's a quick display of many of the awesome fishing stamps in the Fly Daddy set. All three of the males in my house love to go fishing, so you can see how I went nuts over this set! So many options!


You may have noticed the three circles featuring the new 6x6 Too Fly patterned paper pack that's also offered as part of this collection ... some fishing themed, and some basic coordinating designs.


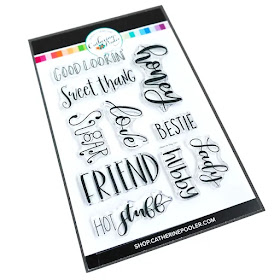
Eeep, the fishing rod and coordinating die!! Use it to catch some fish, or to display your sentiment (these are also included in the Fly Daddy set). Love that there's a "hubby" stamp!

The background texture is from a small cross hatching stamp from the Birds of a Feather set that is stamped repeatedly.


The bottom half of this card features the red and white stripe pattern paper, also included in this pack. I combined two pattern papers here to make my own version ... a thin strip of blue lures is layered over one of the white stripes.


These sentiments are so fab! Both in terms of what they say, and the fun fonts that are used. I cut my own heart out of some copy paper and sponged some ink onto the card base. Then I stamped and layered a few fish along side of the heart in coordinating colors.


On the bottom of this card is yet another one of the designs in the Too Fly patterned paper pack. Also, did you notice the Blackfoot River sequins? The fluted edges on these sequins really grab the light and make a ton of sparkle! These are super handy to double as fish bubbles.


How about this for a sentiment?! You're so fly! Hahaha, love it. I cut out one of the lure stamps and popped it up, leaving the hooks stamped in black on the card base. Even more of the Too Fly paper from this pack is used on the bottom of the panel, with a combination of the red and white stripe, and those charming bobbers!


Do you recognize the pattern on the card base? It's the fish scales! I stamped the fish body several times all around the card edges to make a custom pattern to go along with the fishing theme.


Speaking of fish borders ... here's another version of that. This time I used the horizontal half of the fish to stamp around the panel border.


A few more lures stamped and colored, my favorite fishy sentiment, and we've got fishing card #5 done!


This one might be my favorite fishing card to leave my craft room. Three fish are stamped on the end of the fishing line, along with a coordinating sentiment. I cut out a simple shape from kraft paper to make a boat, and stamped it with the same cross-hatch texture stamp I used earlier.


Is this not the most fun wave of water? It comes from a new Wavy Cover Plate die, which you can see at the top of this photo. I just cut the bottom portion off and used it for this card.


So there you have it, a series of six fishing cards with the new Fly Daddy set, just in time for Father's Day.


Here's a set that I'm in love with as well ... the Ways to Say You set. I laid out many of the words from this set on my Misti and then inked them up in rainbow order.


The gold die on the top of the card is from Ways to Say Hey Dies. The card is cut shorter than usual, so adding this die to the top still allows it to slip into an A2 card envelope.


More patterned paper scraps used at the bottom of this card. Another nice thing about the patterned paper is that they automatically coordinate with the CP ink colors.


Before taking all these stamps off my Misti, I wanted to get another card out of it. Do you do this to? Instead of stamping different colors, I embossed them all in gold. Notice the Perfect Vines Die in vellum this time!


Finally, this giant butterfly from Wings of Joy is just begging to be inked up in all sorts of pretty colors. I applied a rainbow-ish gradient of color to to the stamp, and then blended some more ink onto the paper. You can turn "you are a joy" into "you are a" and then use "Sweet Thang" to finish it off.


Cutting around the butterfly lets you adhere the butterfly in the middle, and then bend the wings up for dimension.


Some ink blending and masking gives you a quick outdoor scene, along with some flowers from this set.


Well, there you have it! Such a fun time in my craft room with this collection!


Be sure to comment here, and along the rest of the stops, as Catherine Pooler will be giving away a $25 gift card! The winner will be announced on the Catherine Pooler blog on May 27th.
  
I'm happy to send you along to the super-duper talented Daniel West who I know has something clever and unique to share with you!

Here are the rest of the stops along the hop in case you need it:

Kelly Griglione <<< You are here!

Thanks so much for stopping by!
-Kelly

Supplies Used (including affiliate links, thanks so much for your support if you're excited about something):

Fly Daddy
Ways to Say You


Friday, May 8, 2020

Can't Think of How to Use Those Small Stamps? Use Them to Make a Large Background!

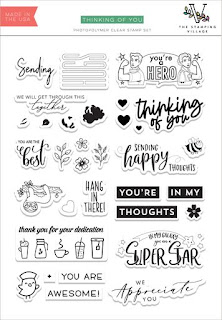
Hi Friends! I'm happy to share a new collaborative set from The Stamping Village, and a new mini set from Altenew! Both cards I'm sharing have a large background design, yet are made from small scale stamps.  


Thinking of You

The companies from The Stamping Village have come together once again to design a collaborative Thinking of You stamp set dedicated to all the men and women working on the front lines. So fun to see what each company contributed, and how they are all true to their own style. In addition, Altenew will be donating $5.00 for every Thinking of You Stamp Set sold to the Save the Children Foundation in an effort to support the cause!

This card actually uses stamps from FOUR different companies: "Sending Hugs' from Studio Katia, "the Best" from Gina K Designs, the tiny heart from Avery Elle, and "We Appreciate You" from Altenew.


Rotating the "hugs" stamp 90 degrees, and stamping it multiple times across your card base, makes for a fun background.

Also I was happy to make a longer sentiment by combining stamps to read "Sending the best hugs, we appreciate you." When trying to combine sentiments like this from other sets, keep in mind that you don't have to use all the words. In this case I didn't emboss "you are" from "you are the best" so it would fit with my other sentiments.


This card uses the mini Breathe set, which consists of a semi-circle filigree design and sentiment. The beauty of this set is that the semi-circle is perfectly designed to form a seamless circle design when you flip the stamp around!


You can hardly tell where the two sections are joined! For this card design, it was fun to overlap the circles and pick random colors from a similar palette. The overlapped sections make some interesting pattern combinations themselves! Loving the font and the size of the sentiment.

It's neat to see how these smaller stamps can still be used to fill a card base. 

Thanks so much for stopping by!
-Kelly

Supplies used (affiliate links used, thanks so much for your support!)

Thinking of You
Breathe

Hello and Hugs Die

Satin Gold Sequins


Saturday, May 2, 2020

Fun Interactive Cards with the New Spellbinders Whimsical and Wild Sets by Jane Davenport


Hello Friends! I was super excited to be able to play with two of Jane Davenport's new Whimsical and Wild sets from Spellbinders ... the Brave Bear and the Horse Hug sets. So in love with the artistry of these images. They do all the work for you!

Let's take a look!


This image totally brings a smile to my face. The idea of a young girl channeling her spirit animal who's big and brave, and who is there to carry her when she's afraid, is so empowering. I think this would be great for a graduation card, for someone who's facing a health challenge, or for anyone facing a tough decision.


I gave the little lady rainbow hair to add to the whimsy. The sentiment is tucked under the bear's paw, like he's carrying the message. An exacto knife cuts around his paw nicely. 
 

I really wanted to make another card with this image. Along with this image, this card features the same sentiment on the front of the card.


I originally colored her dress orange, but I thought it was a little too close to the color of the bear. So I colored another dress, cut it out, and adhered it on top of the orange dress. And added some tiny polka dots. 

You may have guessed that this card has something else going on ... and when you pull the tiny flower at the top (in the middle of all those awesome stars from the next set) ...


The bear pops up and carries the little lady! Not only that, but another inspirational message is revealed (that font!!) I stamped a trail of lady bugs who are also on their way to the "unknown."


I've been having fun making these types of pop up slider cards since I found a baseball card in this style during Spring cleaning and tried my first card. This one turned out just as well. You can really make this style of card with any sort of die cut or fussy cut image. The long flowing hair is a nice feature to be standing out on this card.


This card features the super dreamy Horse Hug set. Knowing the fantasy-style card I wanted to create, I ended up turning the horse into a unicorn! A slim triangle of glitter paper from my scrap pile is all it took.


That sparkle! I extended the length of the horse so the sentiment would fit along the bottom.


The galaxy background is the result of smooshing ink onto the card panel a few times, and then sponging ink around the edges. I embossed the stars in white, but they ended up being too bright and competed with the white horse too much. So I blended navy ink on top of the embossed stars as well. Some flicks of gold and white paint round it all out.


This card is a little different as well, as the unicorn I fussy cut folds out and is the stand for the card. The mechanism is just a strip of paper folded into a box.


This collection of cards was really fun to make! I don't have many whimsical stamp sets like this, so I was really looking forward to trying them out, and wasn't sure if I'd be able to make cards in this style.


Making the interactive cards like the pop up slider, and the unicorn that swings out, add fun elements to the cards.


 Here's a quick view of the sliding pop-up!

All in all, I'm really happy to have tried these whimsical stamps. They made me feel much more artsy than I am. I also love how large the images are and cover the entire card. I will definitely be making more cards with these two sets!

Thanks so much for stopping by!
- Kelly