Friday, November 15, 2019

Bonbon Box Ideas To Try!


Hi Folks! We recently shared this really easy, low assembly Bonbon Box from Essentials by Ellen, and I couldn't stop at just one box. There are so many different ways you can use it, so I thought I'd try a few more! 

First, some quick instructions on making the box:
- cut two pieces.
- place one piece on top of the other (make sure you end up with four walls extending from the square base).
- adhere the two square bases together.
- fold the four walls up.
- bring the two handles together, and put those thru the slots on the opposite two walls

That's it. The slots that go over the handles keep the box closed on their own ... no adhesive needed!


In case you missed it, this is the Bonbon Box I shared earlier where I just stamped a sentiment on the side, and added two shaped die cuts from Holiday Characters.


Another idea is to either use patterned paper, or stamp your own pattern. This one is stamped with the stripe from Winterscapes, but the sky is the limit here. If you have Christmas patterned paper, use that for an easy Christmas box. If you have Halloween paper, use that to hold little Halloween candies. 


Another idea is to create little windows for curious recipients to peek thru. You can do this with a die cut shape, like a star, which would be super cute. Or, you can use the Hinged Alphas! "Ho, ho, ho, ho" turns out to be perfect for this Christmas box, but you could also use the person's initial.


Here's another view of what it looks like. So much going on here, with so little effort. To make things easier on myself I taped the H and the O dies together so I didn't have to line them up each time. Also, note that you can put a pattern on the bottom of the box to change it up even more.

I've got one more idea to share ...


Recognize this?! Yep, it WAS a Coke can! 

You can use this die on a pop can! I picked Coke because the red is perfect for Christmas, and because they have that cute polar bear on their Christmas edition cans. Who needs to stamp and color a bear, when you've already got one?!


I tried being strategic about where I placed the dies on the Coke can, like making sure the polar bear would show well, I also made sure I got as much of the "cola" as possible. This actually required two different Coke cans. 


As an added bonus, these cans also have "names" of people you can share a Coke with, so you can completely customize your treat box! This one has the name "coach" ... how perfect to give a little treat to one of Logan's football coaches, or one of Jackson's baseball coaches? I'm sure they wouldn't be expecting THIS : )

New this year are Coke cans with American college team names on them. Here's a list of the teams. What a great idea for a college kid, or maybe someone who's still a college kid at heart!

As you can see, I had fun playing with the Bonbon Box die. The ease of putting these together really makes it a good candidate for mass production ... teacher gifts, dinner parties, secret santa gifts, surprises for your kids or grandkids, etc. Hopefully you got some ideas, or this sparked an idea of your own to try.  

Thanks so much for stopping by!
-Kelly

Supplies used (including affiliate links, thanks so much for your support!)

Thursday, November 14, 2019

Altenew November 2019 Gradient Cardstock Release Blog Hop + Giveaway


Hello Folks! Welcome to the Altenew gradient cardstock release blog hop! You may have just come from Jen Schow. but if not feel free to start at the beginning with the Altenew card blog.

I was so excited to hear Altenew is now offering gradient cardstock for their layered dies! Just like they offer the gradient inks for their layered stamps : ) Totally takes the work out of hunting for four different shades of pink if you want to make a layered die flower. Here's a few more "official" words about the new offerings:

Our gradient cardstock shades have been hand-selected to coordinate with our inks, making them the perfect choice for layered die cutting, 3D dies, and more! The color families include Cherry Blossom, Green Meadows, Red Cosmos, Sea Shore, Shades of Purple, and Summer Afternoon, and each sheet has been sized to fit on our Mini Blossom Die Cutting Plates. You're sure to find one (or more!) to add to your collection!

Let's take a look at some projects!


Aren't these colors gorgeous?! This card mostly uses the Red Cosmos cardstock pack ... for the layered flowers AND the background. I love how rich all the reds look together.


The leaves come from the Green Meadows cardstock pack. I can't stress enough how luxurious it is to sit down, open a pack of green and red paper, and just start running your dies through the machine. Since the papers are slim, you can fit two papers side-by-side on a standard die machine. I cut them in half lengthwise so I can have all four colors go through the die machine in one pass. Very efficient!


Let's also talk about the beautiful Peony Dream 3D Die here ... it has two main flowers that you can either layer on top of each other (like the bottom flower) or use individually (like the top flower) for a different look.


Here's a close-up. I backed each main layer with chipboard to give it a ton of dimension. You really can't help but run your fingers over it when you see it in person!


One other thing to note, I wanted the smaller flower to be up in the pink section of the card, but it looked odd floating up there without a stem. I was going to cut a strip of paper to use, but then I decided to cut another set of leaves (from Virginia Rose 3D Die), and just take all the leaves off. Voila, a beautifully thin and slightly curved flower stem!


This card uses one of the beautiful blues from the Sea Shore collection as a vertical panel on the card. In the same color family, I stamped the bold leaves from Dot Botanicals to groud the arrangement. The white on the left of the card was looking very stark and unbalanced, until I remembered the white Graph Die Cut Tape. Perfect texture to add for some balance!


Remember on the last card I said you can layer the two main flowers in Peony Dream 3D Die or use them separately? This card just uses the larger flower as the focus of the card. And instead of white highlights, they deep red from the Red Cosmos set for a different look. I also stenciled some dots on the petals with my most-used stencil, Feeling Dotty.


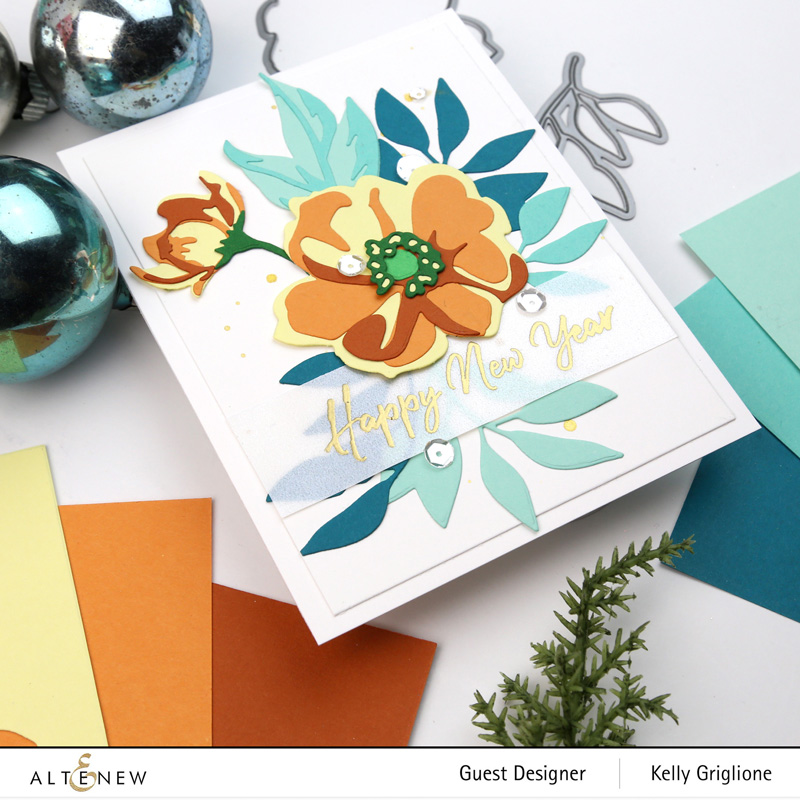
I never would have imagined it, but this is actually my favorite color combination! The yellows from Summer Afternoon and the blues from Sea Shore look stunning together.


They both have a lot of gray in them and screm "Fall" or "Winter" to me ... which is the perfect palette for a floral Happy New Year card. Bright yellows and aquas are often better suited for the traditional summer florals.


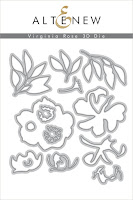
This particular flower is made with the Virginia Rose 3D Die Set. This set has the stem for the smaller bloom all figured out already.  I knew I wanted to make blue leaves for this card, but I wasn't prepared for how much I'd like them with the yellow and tan flowers.


I would use that light blue on every card if I could ... it just makes me happy : )
Bundle Pack

Here's a look at all the color families that are being offered. If you're not sure what colors you're going to want to use, you can also purchase the cardstock bundles as a set, with a 5% discount.


Also, the cardstock is sized to fit in the cute Mini Blossom Die Cutting Machine ... which happens to be 20% off now through Friday 11/15.

I really enjoyed being spoiled with my pre-cut and pre-matched cardstock. I only planned on making two cards, but I kept wanting to try different combinations of colors together. Fun times!

Prizes:
To celebrate, Altenew is giving away a $30 gift certificate to 6 lucky winners! Please leave a comment on the Altenew Card Blog and/or Altenew Scarpbook Blog by 11/20 for a chance to win. 

We'll also draw a winner to receive a $15 gift certificate from the comments left on each designer's blog on the blog hop. All winners will be announced on the Altenew blogs on 11/23. 

I happily send you off to the fabulously talented Jaycee Gaspar ... it's always such a JOY to see what he's come up with!

Thanks for stopping by!
Kelly


Supplies used (affiliate links included, thanks so much for your support!)

Green Meadows Cardstock Set
Red Cosmos Cardstock Set

Sea Shore Cardstock Set

Summer Afternoon Cardstock Set

Peony Dream 3D Die

Virginia Rose 3D Die

Sunday, November 10, 2019

Blimps and Bonbons - Essentials by Ellen November Release


Hi Folks! Welcome to the November Essentials by Ellen Release Hop! I've got a couple cards and one project to share. You may have come from the one-and-only Sandy, but if not feel free to start at the beginning with the one-and-only Julie!


As soon as I saw this Up in the Air stamp set, I was dying to get my hands on it ... it's so unique and perfectly suited for older kids and teens. There's a time to send them the cute teddy bears, and then all too quickly they think they're "beyond" that.

The blimp is large and simple enough to be a good candidate for paper-piecing, which I've done here. I also added "12" from Hinged Numbers to personalize the age. The banner flying behind it carries part of the sentiment.


There are a couple other sets at work here, including a new set of cloud dies! Always a fan of felt clouds for the awesome texture. Totally Random Saying, Vol 3 supplies the scripted sentiments. And the skyline is cut with the useful Big City die (quickly becoming one of my go-to dies for scene building).


This is a one layer card, which obviously uses the Up in the Air blimp set, but also uses the new sentiment set That Thing You Did. Love this set! There are a lot of fun, sassy sentiments in the set, although for this card I went with a more traditional sentiment. The thick vs. thin font is very appealing to me, as well as having several choices for a secondary sentiment.


I've blended ink for the sky and the blimp, using masks I cut from plain copy paper. Here you can also see some of the other elements included in this set, like the clouds, birds, and cheering fans on the ground. These enthusiastic onlookers really add a lot to the happy feeling of this scene!


Sometimes when I get a stamp set that has a specific, distinctive image like this blimp, I use it a couple times and then feel like I need to move on to different sets to avoid making cards that are too similar. The large open areas of this blimp, however, lend themselves to lots of different coloring techniques, patterned paper, paper piecing, etc. to keep the cards different enough for lots of uses. I really appreciate that.


Another fun die available this release is the Bonbon Box die. It cuts two sides of the box, so you only have to run it through your die cutting machine twice to get all the pieces necessary. It's pretty amazing how it's designed to stay shut on its own just by putting the handles through the slots. Before assembling it, which really only entails adhering one of the bases on top of the other, stamp whatever sentiments you'd like.


Santa is from the recent Holiday Characters set and is attached to a new mini tag from the appropriately named die set Mini Tags.

Prizes
We’ve got super fun prizes!!! One random & lucky commenter will win $25 to the EH shop and one will win the whole November Essentials by Ellen release!!! To enter for a chance to win, make sure to leave comments at each stop along the hop! Comment before Thursday, November 14th at 11:59pm PST. Winners will be notified by email.

It's now my pleasure to send you to the super-talented Elena!!

Sure hope you've enjoyed the projects here, as well as from the rest of the talented Ellen Hutson team! I'm so glad you've stopped by : )

-Kelly

Supplies Used (affiliate links, thanks so much for your support!)


Bon Bon Box, Essentials By Ellen Designer Dies

Mini Tags, Essentials By Ellen Designer Dies

Small Sayings, Essentials By Ellen Clear Stamps

Clouds, Essentials By Ellen Designer Dies

Up in the Air By Brandi Kincaid, Essentials By Ellen Designer Dies

Up in the Air by Brandi Kincaid, Essentials By Ellen Clear Stamps

That Thing You Did, Essentials By Ellen Clear Stamps

Big City by Julie Ebersole, Essentials By Ellen Designer Dies

Totally Random Sayings Vol. 3 by Julie Ebersole, Essentials by Ellen Clear Stamps

Holiday Characters by Julie Ebersole, Essentials By Ellen Clear Stamps

Holiday Characters by Julie Ebersole, Essentials By Ellen Designer Dies

Black Jack, Catherine Pooler Ink Pad