In case you haven't heard of
Stamp of Approval, each collection contains new, exclusive stamps and dies that are meant to coordinate with each other. Most of these products won’t be available individually until much later in 2016 or early 2017. If you want to be one of the first people notified when they go on sale, simply
subscribe to the wait list. The collections sell out quickly!
Now on to the projects ...
Once I got started with the Merry and Bright Boughs stamp set I fell madly in love. It has a very clean look to it, and all the components work so well together. You can tell Catherine really put a lot of thought into this one. I honestly could not put the stamps down and kept coming up with different ways to use them. So now I present you ...
Five ways to use Merry and Bright Boughs
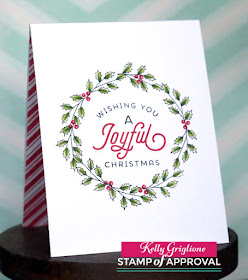
1. Make a wreath. For this card I traced a circle with pencil and then stamped the holly sprig around the circle. You might think coloring all the leaves is labor-intensive, but it's actually not bad. For each leaf I swiped a light green marker straight down the middle, and then made a smaller swipe with a darker green marker. The holly berries have the highlights in them already (love) and then let's talk about that sentiment ... the curve of "wishing you" could not be any more perfect to fit inside a wreath! Since they are all separate pieces it's easy to pop the "joyful" in a coordinating color. Finally, the inside is stamped with the Peppermint Stick Background stamp. The dense, red stripes are a good contrast with the clean, one-layer, white front.

2. Make a FALL card. Any time I can get more than one occasion out of a Christmas set, I'm excited. So you may imagine how happy I was to figure out that this set makes a pretty charming Fall wreath. Same penciled circle as the last card, and then stamp the branch and berries. Having the branch and berry images separate makes for quick multi-colored images. The sentiment is made non-Christmasy by using brown and orange, and by covering up the "holi" in "holiDAY". The edges of the card are blended with yellow ink. You would never guess this card came from a Christmas set!

3. Create a sentiment inside your card. I'm always looking for a good sentiment for the inside of my Christmas cards, and this may just be it. Even though there's a lot to it visually (the curve at the top, the second color in "merry", the script vs. print font, the holly image) it wouldn't be hard to mass produce. You would have all the black ink elements ("wishing you a", "christmas" and the holly sprigs) laid out on one stamping block, and then all the red elements ("merry" and the berries) on a second stamping block. Then it's just a matter of swiping the markers to color the holly.

4. Make a Christmas tree. Like the wreaths, I lightly drew a tree trunk and branches in pencil, and then went about stamping the pine boughs in different colors of green ink along the lines to make my own tree. With this method, you can make any size tree you want ... short or tall, fat or skinny. So versatile! Also, this set comes with two different pine bough stamps that curve in opposite directions. This helps make the tree look like it wasn't made with the same stamp repeated over and over. The star on top is from the Hip Holiday set. The "Merry" die is from the Merry Labels dies, and to make it curved I just bent the paper in between the letters slightly.
This is a two-fer example ... I was practicing on another card and thought I might as well finish it off. This tree has sequins to dress it up, but you could add ornaments, presents, peppermints, all of which are stamps in other sets in this collection. The sentiment is layered embossing on a label die from Merry Labels.
5. Make a Charlie Brown tree. Hahaha, these trees always crack me up, and to be honest, I've always wanted a stamp like this. So easy to make your own Charlie Brown tree now. Just stamp the evergreen boughs twice, and then use a brown felt-tip marker to trace over the branches and make the trunk. For the base of the tree I cut two rectangles, colored them brown, and then made nail hole marks with a black pen. The sentiment uses the "christmas" stamp from this set, and then I just wrote "merry" in cursive above it with a felt-tip marker. Finally, the whole panel is layered on top of a kraft card base stamped with the Peppermint Stick background stamp.
So now you see how much I enjoyed working with this stamp set, AND, there are two additional stamp sets included with this collection that I didn't even tap into yet. Not to mention the die sets! Lots of goodies here!
Your next stop on the blog hop is the very talented Laurel Beard!
This is the first day of the hop, but be sure to check out the hops on
the next two days with a whole new set of designers and projects. Not
only are you in for lots of inspiration, but on each of the three days
of the hop, Catherine will be giving away an entire box of this seriously fun
collection! You just need to leave a comment to be entered to win.
The sales links go out to StampNation members and the wait list on September 21st, and then the general public on September 22nd.
Thanks for looking!
-Kelly
Here is the full blog hop list:


